Thursday, December 31, 2009

2010 Resolutions


So I lied. This will be my last post for 2009.

I was thinking about some things I wanted to accomplish in the next year and thought, "I should make some New Year's Resolutions.". Then I thought, "Hey, that might make a good blog post!". So, here we go... my resolutions for 2010.

- Stop apologizing for my camera. I have a Nikon D90. It's not the top of the line camera. It's really not even considered a "pro" camera. But you know what? It's awesome! It does everything I want it to do, it's never missed a shot and it takes great photos. I'm sure when I get a new camera I'll upgrade to a pro body, but for now, I love my D90 and will no longer refer to it as if it was a lesser camera.

- Get organized. The most basic but most complicated task. I'm pretty sure this one is sink or swim. Get organized or get out.

- Learn to "read" photos for lighting. This is a very personal goal. In an attempt to grow and develop my skills in the studio, I want to look at a photo and be able to figure out how it was lit and recreate that setup. I see much frustration but many great rewards in my future.

- Grow and maintain my network. I'm really bad at this. Just about anything will be an improvement.

- Get out and shoot more! It's so easy to dig around the house or walk out into the yard and find something to take a picture of. I need to get in the car, drive somewhere and photograph this amazing state that I call home!

There you have it. Those are my five resolutions for 2010. Hopefully they'll develop into some good habits that last for many years to come. Have a safe and happy New Year!

Wednesday, December 23, 2009

Happy Holidays!


Yesterday's post will be my last post for 2009. I'll resume posting the first week of January, 2010. Look for lots more studio shoots, as I plan to start working in a studio in January, plus reviews of all of the lenses I currently use.

Enjoy the last week of 2009 and be safe!

John

Tuesday, December 22, 2009

Tech Tuesday - Nikon Wireless Remote ML-L3


It's probably one of the cheapest camera-specific items in my camera bag. It's tiny, has one button and only costs around $15. This is an item I use very frequently and I'm not sure what I'd do without it. Nikon's ML-L3 wireless remote is, to use a popular phrase, worth it's weight in gold.

The ML-L3 weighs about half an ounce and is hardly bigger than an SD card. If you slip it into your pocket, you won't even notice it's there. It doesn't take up any space in your bag, but make sure you put it somewhere where you can find it!

The ML-L3 isn't fancy. It's got one button that, when pressed, triggers the shutter. That's it. It's an IR remote, just like the remote control for your television, so it requires line of sight to operate. With that being said, I've used mine from many different angles, including in front of and behind the camera and at a distance of up to 15 feet. It will work on the D40, D40x, D60, D80 and D90. For models above the D90, you'll need the MC-36, which is a wired remote that offers far more options.

So what do I use the ML-L3 for? Just about anytime my camera is on a tripod, the ML-L3 is in my hand. I use it for macro work. I use it in conjunction with Live View when the camera is in an awkward position. I use it for self portraits. The image below would have been much more difficult without a remote. If I had to time every face with a timed shutter release, not to mention running back to the camera after every shot, it would have taken much longer to shoot, but with the remote, I could just press the button a few times, make a few faces and just stop once in a while to check exposure or change colored gels.


There's not really much more to say about this. It's a wireless remote. You push the button and it takes a picture. It's super small, super lightweight and super inexpensive. If you've got a camera that it will work with, there's no excuse for not having one of these in your bag or pocket at all times.

Friday, December 18, 2009

The Big Studio Shoot


On Tuesday, I discussed my big leap into working in a studio. While the lighting stuff is pretty cool (OK, maybe just for photographers), how about the actual shoot? How were the models to work with? What were some of the ideas behind the shots? How was the mood? What's it like to be at a photo shoot with so many photographers and models? Today I'll give you the inside scoop!

The shoot was set up by Jay Kilgore as part of Colorado SuperShoot. It was basically a big photoshoot party for everyone he's worked with through Colorado SuperShooot in the last year. The morning shoot was a lingerie shoot, which is not what I normally do but I'm not going to complain. The afternoon shoot was a fashion shoot. By the end of the day, there were over 20 models to work with. Some of them tended to stand out, maybe due to their personality, maybe due to their skills. I'll post separate posts about them at a later date. Today's post is just about the experience, and what an experience it was!

The morning lingerie shoot was a lot of fun. I'm not just saying that because there were a bunch of models standing around in their underwear! Everyone was very relaxed. No one was uncomfortable. The music was turned up, people were dancing and laughing, and we were getting some great photos. Here's a tip: If you're getting good photos, show them to your subject! Regardless of whether you're an experienced model or if it's your first photo shoot, having a photographer say "These photos are looking great!" and just keep shooting does not compare to hearing that and then actually seeing the photos. It's an instant boost in confidence! Plus, there's been many times I've thought the photos are looking great, but when I show them to the subject they notice something they don't like and then change it, making even better photos.

We eventually had 4 different locations for shooting in the morning. For some reason, that wasn't enough for me, so I asked if anyone wanted to step outside and shoot against the side of the building. Keep in mind, it's 40° and windy outside and everyone is in lingerie. Kat stepped up and volunteered! We didn't stay outside long, but we did get some great shots. Once we came back inside, it was just constant shooting for the next few hours. The photographers and models all slowly cycled through the different setups so everyone got to shoot everywhere.

Eventually it was time to move into the fashion part of the shoot. More models started to show up and the ones from the morning changed. The photographers decided to change a few of the setups, so while the models got ready we moved equipment around. Fortunately, the kind people at the North Denver Photography Studio let us spread out into the other studios, basically giving us access to the entire place. This opened up so many different possibilities for shooting, it was a little ridiculous! Suddenly we had scenery, props, backdrops and more equipment. It was time to shoot!

Because we got so spread out, we had the flexibility to tweak the lighting so that it looked the way we wanted. Instead of shooting the same person with the same lighting setup as 5 other photographers, we had the chance to create something unique. Some of the models, like Caleb and Brandy, really took this opportunity to voice their opinions and help to create some great images. For all of this, I am grateful to the studio and the models.

At the end of the day, after working with so many different people in so many different locations, I had taken lots of photos, and when I say lots of photos, I mean, "Wow, when am I going to have the time to edit all of these photos?". What really makes me happy is that it wasn't like a production line: Pose... shoot... next! Pose... shoot... next! There was interaction. Contacts were made, stories were told and laughs were shared. Everyone seemed to get along and have a good time. Really, isn't that what it's all about?

You can see more photos here.

Tuesday, December 15, 2009

Tech Tuesdays - Lights, Strobes and Modifiers


First off, let me make it clear that I'm no expert when it comes to studio lighting. I've always been a little intimidated by it, mostly due to lack of experience. With that being said, there's no way I'm going to write a comprehensive study of studio lighting techniques today. Instead, I'm going to give a "fist impression" of my crash-course in lighting I received this weekend.

I was fortunate enough to attend a year-end party/networking event for local photographers and models. It was held on a Saturday in a large studio that had lots of different locations and lights that we could use. Having lots of lights, lots of space and lots of models to work with is an experience that can be very overwhelming or extremely rewarding. I was richly rewarded.

There were many different lighting setups that I was able to use, but I'm going to focus on four of them here. They include a softbox, a strobe with a honeycomb grid, a beauty dish and a hot light in a softbox. They all have their specific uses and they can all give different looks. Here's my take on each one...

Softbox:
This is probably the most common studio light. Take a big flash, put it inside of a fabric box to diffuse and shape the light and you're ready to make some pretty pictures. Depending on the size of the softbox (they can range from 2'x2' squares to 8' octagons and larger), the light can either light a specific part of a subject or fill an entire room. Most of the setups on Saturday used at least one softbox. The image you see below used the same setup as seen in the above image, which was three softboxes (two of which you can see). The two that are visible on the sides of the photo were used to "rim" the subjects and separate them from the background. The main light was provided by a large (maybe 4'x4') softbox in front of the scene.


Honeycomb Grid:
This is a specific attachment that goes on a strobe. Instead of putting the strobe in a softbox to soften the light, it's left exposed which gives a much harsher light. If you just fire a strobe, though, the light tends to spread out and light everything in front of it. By attaching a honeycomb grid to the front of the strobe, the light is focused into a defined beam of light (somewhat like a snoot, but the light is not as shaped and defined). It almost gives a spotlight effect. In the image below, you can see how quickly the light falls off into darkness. The hardest thing about shooting with this light was the if the model moved just a bit, they quickly moved out of the light and into shadow.


Beauty Dish:
This is another attachment that goes on the front of a strobe. It also shapes and directs the light, but it gives a much different shape of light. It's basically a big, shallow bowl that gently throws all of the light on your subject but without the harsh edges of a honeycomb grid. It's called a beauty dish because it produces a very flattering light source. I was able to use this one light to create the three images you see below. The first was shot almost directly in front of the beauty dish, which gives nice, even lighting. The second was shot off to the side, which gives a little more dramatic shadows. The third was shot much closer to the dish and with it placed to the extreme side of the subject. It also had a "sock" over it to diffuse the light (much like a softbox). One light, three very different looks. This might be my favorite light modifier.


Hot light:
If the beauty dish is my favorite light modifier, the hotlight might be my favorite light. I have lots of experience working with natural light. In some ways it's easier because what you see is what you get. The sun is a constant light source. A hot light is also a constant light source. It's really just a big, bright lightbulb. You turn it on, you set your camera to whatever you want without worrying about strobe sync speeds and lighting ratios, and you shoot. When placed inside of a softbox, a hot light produces some absolutely gorgeous, soft light. The shot below was taken with a hot light placed inside of a softbox.


Before Saturday, I would say my experience with studio lighting was minimal at best. Now that I've had time to get inside of a studio and really play around with different lights and modifiers, I think I might be hooked. There is so much possibility and so many options once you're in the controlled environment of a studio, you are only limited by your imagination (and budget). Don't get me wrong, I'm not going to quit taking photos outdoors. Instead of that being my only option, I'll consider using a studio an option as well.

Tuesday, December 8, 2009

Tech Tuesdays - Snoot!

Photo credit: Flickr user - morberg

Photography is all about light. If you can control light, you can improve your photographs immensely. One way to control your light is with a snoot. What is a snoot? A snoot is simply a long, narrow attachment for the end of your flash or strobe. Instead of light "spraying" out of your flash, a snoot shapes and controls the light into a narrow and well-defined "stream". Imagine how water gushes out of an outdoor faucet when it's turned on. Now, attach a hose to that faucet and you have a nice, controlled stream of water. That's what a snoot does!

You can purchase snoots of all shapes and sizes, but you can also make your own very easily. For my hot-shoe flash, I use a heavy cardboard tube that's about 16" long. The flash fits inside of it perfectly and the light that comes out the other end is quite nice. Not too bad for free, right? You can also just roll up paper or use gaffer tape to make a quick and custom snoot. Sure, you can always buy one, but free is good! I'm sure if I used larger studio strobes I wouldn't want to bother making my own snoot, but for a hot-shoe flash, it's really easy to do.

So why do you need to control light? What's wrong with just using a flash as a flash? If you want to create a spotlight effect where an object is bathed in a pool of light that is surrounded by darkness, you might just need a snoot. If you want to light just a portion of your subject without lighting the rest, you might just need a snoot. If you want to create dramatic light without a bunch of spilled light reflecting and filling your dramatic shadows, you might just need a snoot. If you want to shoot a beam of light through a column of smoke without letting any light touch the background so that only your smoke is lit, you might just need a snoot.

Here are a few examples of images take with and without snoots:

This image was taken with a snoot on the flash. Notice how there is mostly just light on the angel and not much on the surrounding table? With an even smaller snoot, I could have just lit the angel.

This image was taken without a snoot on the flash. The light was not focused and therefore hit the angel and the table. Furthermore, the extra light that hit the table bounced back up and lit the angel even more than I wanted.

If you're not convinced that you need to buy a snoot, try making one! All it really takes is some paper and tape. If that's all it takes to push your images to the next level, you'd be crazy to not try it!

You can see more images in which I've used a snoot here, here , here and here. You can also just search for "snoot" on Flickr to see the variety of images you can produce with such a simple tool and a little creativity.

Friday, December 4, 2009

Cami


What's up with me lately? As you might remember from Victoria's photo shoot, I didn't recognize her when she showed up. Once again, I've proven to be Mr. Non-observant. I met Cami in Fort Collins and she texted and said she was almost to the coffee shop where we were planning on meeting. I headed over to the coffee shop and waited outside... in the cold... for about 15 minutes. I thought I'd catch her when she got to the shop. It turns out she beat me to the shop and she was already inside. To add a bit more irony, she was sitting right by the window that I was sitting on the other side of. I kept thinking, "that sure looks like Cami, but it couldn't be." It was.

Once we got that straightened out, we headed to our location and started shooting. I had found the location on an earlier shoot and made a note to re-visit it. It had lots of tall grass, dead trees that had fallen over and a little creek running through it. It was just about the perfect location for an autumn photo shoot.

We started a little later in the day to get the best light possible. Cami was awesome. She took direction very well in order to take full advantage of the light. She had a good variety of looks and poses. She wasn't afraid to move around and use all parts of the location, even if it meant getting a little dirty or cold.

After an outfit change, the sun started going down fast. This gave us the best light of the day, but it started to get cold quickly. Once again, Cami came through and we got some excellent photos.

While I was editing the photos, I realized that these are some of my favorite photos I've taken in a while. I've really enjoyed all of my photo shoots up to this point, but all of the stars lined up for this shoot. Between the location, the weather, the sunlight and Cami, these photos just worked. Thank you Cami for a great shoot and great photos!

You can view more photos here.

Tuesday, December 1, 2009

Tech Tuesdays - SD Memory Cards


In photography, it's all about getting the shot. Sometimes, getting the shot can mean being ready at the right moment. In business, time is money. The less time you spend on non-productive tasks, the more time you can spend on making money! Can something as simple as a new memory card help you to get more shots, not miss a shot and save you hours a year? If you buy the correct memory card, the answer is yes.

Today I put three different memory cards to the test. All are made by SanDisk, probably the most popular memory card manufacturer around. Since my D90 takes SD cards, that's what I'm testing, but I'd assume the numbers would almost directly correlate to CF cards as well. I decided to put each card through three different tests...

- Test 1: Shoot RAW + JPEG continuously for 30 seconds. Results show number of images recorded.
- Test 2: Shoot JPEG only continuously for 30 seconds. Results show number of images recorded.
- Test 3: Upoad 1.09 GB (188 RAW + JPEG images) from card to hard drive. Results show minutes:seconds it took to upload.

Here are the cards I used...

- C1: SanDisk (Class 2)
- C2: SanDisk Ultra II (Class 4)
- C3: SanDisk Extreme III (Class 6)

All of the shooting tests were carried out on a static scene with the same camera settings: f/8, 1/100 sec, card formatted before each test. The D90 apparently has a 100 JPEG limit, so it filled up in 2 of the 3 JPEG only tests, but there was still a difference. Here's the numbers:

Test 1: C1 - 15, C2 - 29, C3 - 41 (images)
Test 2: C1 - 47, C2 - 100, C3 - 100 (images)*see note below
Test 3: C1 - 1:45, C2 - 1:44, C3 - 1:08 (minutes:seconds)
* Although C2 and C3 were both able to record 100 images in 30 seconds, the camera buffer filled up with C2 and shooting was not truly continuous, while the camera buffer never filled up with C3, providing a truly continuous shooting experience.

So what do these numbers mean? To put it simply, you'll get more photos, rely less on your camera's buffer and upload photos more quickly with a faster card. To break it down a bit more, let me give a bit more detail for a few of the statistics.

When I was shooting Test 1, as soon as the camera buffer of 7 frames was filled, C3 continued to shoot, write and then shoot again fairly quickly. I wouldn't mind using it for bursts of more than 7 photos. When using C1, on the other hand, there were a few seconds of writing time after the buffer filled. If you tried to use this card on a fast-moving object, after 7 images you'd miss everything else while the first 7 images were being written from the buffer to the card.

On Test 2, the buffer filled fairly quickly when shooting with C1. With C2, it shot for at least 10-15 seconds before the buffer was full, but it still shot fairly quickly, allowing me to shoot 100 images in 30 seconds. With C3, I never filled the buffer and shooting never slowed below the max FPS rate.

For Test 3, I was surprised to see that C1 and C2 both took the same amount of time to upload from the card. What was not surprising is the amount of time it took to copy the files from my computer to the card. I almost wrote this entire article while waiting for the data to go from computer to C1 (OK, that's a bit of an exaggeration, but not much!).

When you look at the price difference between a Class 6 card and a Class 2 card, it's easy to convince yourself that it's better to save money on a memory card and spend it on a new lens or something like that. What I've learned is that you almost always get what you pay for and if you're serious about shooting action and don't want to wait forever while your photos upload, spend the extra money and buy yourself a fast memory card. You'll be amazed at the difference!

Wednesday, November 25, 2009

Charlie


When Rob and Kathryn asked me if I'd take some photos of their son, Charlie, I was super-excited. I had never taken photos of a child as young as Charlie, so I was ready for the experience. I might have been spoiled from my first experience, though, as Charlie is a very cute baby and was quite well-behaved!

I arrived at Rob and Kathryn's house in an older neighborhood of Boulder. The south side of their house had been remodeled by a previous owner, and part of that remodel included lots of windows. Because of the windows, there was plenty of natural light available to work with, so we just set up a little cozy area for Charlie out of the direct sun and I started taking photos.

I must admit, I was surprised at how well-behaved Charlie was. He was alert, wasn't fussy and was basically the perfect subject. I think he would have been fine to lay there for hours if we hadn't decided to change his outfit. Once the outfit was changed, our groove was gone and he got a little fussy. Fortunately, it wasn't a big deal and we still got some great photos of him in his next outfits.

The grand finale came when we let the dogs come in for a closer look at Charlie. Typically, they're always getting close to him, checking him out, and even sneaking in the occasional lick. For our photo shoot, they were on their best behavior and even when we invited them to come visit Charlie they were hesitant. We finally got a few photos of him and the dogs after much coaxing and patience.

This might have been my first photo shoot with an infant, but I know it won't be my last. Thank you, Charlie, for being such a good little guy. I hope to work with you again soon!

You can see more photos from the shoot here.

Tuesday, November 24, 2009

Tech Tuesdays - Rangefinder Magazine


I love magazines. It's no secret. At any point in time I probably have at least 5 unread magazines laying around the house, usually many more. There are few things I have a hard time not purchasing, but anytime I'm in a bookstore I rarely leave without a new magazine to add to my "to read" pile. I have a few non-photography related magazines, but the majority of them are about photography. The only problem with magazines, especially the ones that are printed overseas, is that they are quite expensive.

Now, imagine that you love magazines, that you're very picky about magazines, that you don't want to waste your time on filler and advertisements and on information that you already know. Imagine that I tell you that there's a magazine that has loads of great, useful, current information that pertains to you, an avid and possibly professional photographer. Imagine I tell you that every single article in this magazine is worth reading and that the articles are long and well-written. Sounds pretty good, right? Now imagine I tell you that it's free and will be delivered to your mailbox every month. All you have to do is sign up online.

Free? The only free things that come to my mailbox for free are not worth reading. They get one look and then get recycled. Plus, there's got to be a catch, right? I'll end up on a bunch of junk mail lists. It will be printed on cheap paper and get torn up in the mail. Things like this do not exist anymore. Imagine I tell you that you're wrong.

Rangefinder Magazine has got to be one of the most well-kept secrets around for a photographer. It is truly a free magazine that is full of great information. You won't end up on junk mail lists, or at least I haven't after close to a year. It's printed on high-quality paper and it shows up every month looking great. Out of any photography magazine I've ever read, Rangefinder is probably my favorite and by far the most useful.

A typical issue of Rangefinder includes about 3-5 long articles about photographers. Each issue has a theme and the photographers all work within that theme, so one month might be Fine Art and the next might be Black and White. In addition to the articles about photographers, there's also articles about industry trends, new gear, software, news and events. Most importantly, though, it's written for professional photographers, so almost every article has a focus on running and improving your business.

To be quite honest, I could pull out example after example of the great content and writing that you'll find in this magazine, but since you have nothing to lose by subscribing to it, I suggest you just sign up and wait for your first issue to arrive. If you don't immediately devour it and wait anxiously for your next issue to arrive, you'll have more options soon. I'll be posting many more magazine reviews in the coming months... just as soon as I read through my pile.

You can subscribe to Rangefinder Magazine here.

Thursday, November 19, 2009

Victoria


They say you don't get a second chance to make a first impression. Does it count if neither of you knew it was your first impression? Victoria and I had never met before, but I had seen photos of her online. We were both in the right place at the right time for our shoot, but she didn't know me and I didn't recognize her (her hair was different). Luckily, we finally figured it out and started with our shoot.

We started off down by the river in some trees and bushes that had all lost their leaves. The patterns and textures they provided with the sun shining through them looked amazing as a background. These are some of my favorite back-lit photos that I've taken.

While the sun was setting, we decided to take advantage of "the Golden Hour", or that hour right before the sun sets where the sunlight takes on a very warm, golden color. Instead of using the sun to backlight Victoria, she turned towards it and let it's warm color light up her face. I hadn't had much experience photographing people in this light, but after seeing the results I'm going to schedule more shoots for sunset!

Before the sun completely went away, Victoria changed outfits one more time. This was a much edgier outfit, so we found a brick wall that the sun was drenching in the last orange light of the day. She had some awesome poses that were enhanced by her shadow on the wall behind her. It's like having two people in the shot!

Once the sun set, we weren't quite done yet. We used up all of the available light in the sky and I filled in where needed with flash. This gave the photos a more harsh look, which was quite fitting for our last location. We found a corrugated metal wall with a fan that was blowing warm air straight down. The fan was great to get Victoria's hair blowing around and she appreciated the warm air on a chilly evening. It wasn't long before the fan turned off and the cold started to win, so we had to call it a night shortly after dark.

First impressions are tricky things. Sometimes they can make you or break you. Other times they're completely forgettable. In my opinion, what really counts is the lasting impression, what you and the other person remember after you part company. For Victoria, I have a great impression after working with her and look forward to our next meeting. Hopefully I recognize her...

You can see more photos here.

Tuesday, November 17, 2009

Tech Tuesdays - Lastolite Tri-Grip Diffuser


There are some pieces of equipment that aren't always needed, but once you use them in a particular situation and see the results, you're never caught without them. For me, a diffuser is one of those pieces of equipment.

I use a Lastolite Tri-Grip 1-Stop Diffuser. Why is it called a Tri-Grip? Most diffusers and reflectors are circular or rectangular. The Tri-Grip is triangular, like fan. That's the "Tri". The "Grip" comes from a sturdy rubber and plastic piece that allows you to hold and position the diffuser without it losing it's shape. Most diffusers and reflectors are simply fabric stretched across a flexible fame. When you hold the side, you're actually holding onto a small piece of metal and fabric. The Tri-Grip's sturdy handle gives much greater control over the positioning of the diffuser.

The Tri-Grip is collapsible. With a simple twist, it folds up and fits into a small, flat bag (imagine a sun-shade for your car window... that's how it works). It's also very lightweight. Taking it to a shoot doesn't add much weight or bulk to what I'm already bringing along. It's also easy to hold or to strap onto a light stand. The handle has a large velcro strap on each side which can be used to secure the diffuser to various objects so that you don't have to hold onto it while shooting. Another great hand-free option is made possible by it's shape. Because it has flat sides, just set it on the ground, lean it so that it's reflecting a bit of light onto your subject and you don't have to worry about it rolling away like a round reflector or diffuser.

So now that you know what it is, how does the TriGrip work? I've just got one word to describe it: Awesome! Like I said at the beginning, you might not always need a diffuser, but once you know when and how to use it, you can get amazing results. I've used it in direct sunlight to decrease harsh shadows and give an amazing, warm glow to skin. I've put it in front of my flash units to diffuse the flash and give a more even look to my lighting. I've used it to reflect just a bit of light into some shadows. I've even used the case as a seat for a client when she was sitting on the ground so that she wouldn't get dirty!


In my opinion, photos speak louder than words, so take a look at some photos I've taken with my Tri-Grip Diffuser and you'll see that it does it's job and does it well. Now that I know how useful the Tri-Grip Diffuser is, I'm planning on getting a Tri-Grip reflector. If you do a lot of shooting in harsh light, I'd suggest you put a few of these on your wish-list also.

Friday, November 13, 2009

Sherri and Justin


Sherri and Justin are a super-cute couple who have moved to Colorado from out East. We spent the day together in Fort Collins sampling beer, shopping and taking photos. We shot at two different locations that both represent Fort Collins: the Poudre River and CSU.

One thing I noticed that they loved was just saying "Poudre". It inspired a giggle every time. That seemed to carry throughout the photo shoot. They both love to be goofy and have a good laugh. Sometimes during a shoot I'll tell a couple to get a little silly so we don't have as many "serious" photos. With Sherri and Justin I had to tell them to get a little more serious once in a while.

After spending a good amount of time on the river, we headed to CSU's campus to get in some photos before the sun went away for the day. Since it was a Saturday, there weren't many students around and it felt like we had the entire campus to ourselves. We started on the steps of the Administration Building and worked our way over to the library. On my last trip I noticed a tiled wall that I knew I'd have to use for a shoot someday. Today was the day and the photos in front of that wall are some of my favorite of the day.

I knew that a shoot with Sherri and Justin wouldn't be a "normal" shoot, so of course, it got a little strange at the end. Police cars and fire trucks came rushing towards the library. I would assume that someone was hurt inside, but hopefully everything was OK. Then there was this squirrel. It was having a staring contest with Sherri and wouldn't leave. Justin decided to start talking to it and it decided to take a flying leap from the sidewalk to a tree. It was the strangest thing we've seen in a while. Once we saw that this squirrel could jump pretty well, we decided to leave it alone and call it a day.

Once I got home and reflected on their personalities and interaction with each other, it inspired me to get a little funky when processing these photos. Thankfully, they are just as happy with the photos as I am.

You can see more photos here.

Tuesday, November 10, 2009

Tech Tuesdays - Tripods


Last week I was painfully reminded of how much I need my tripod. No, I wasn't in a low-light situation and came away with blurry photos. I was too lazy to go get my tripod out of my car and had to use... my old tripod!

To be fair, my old tripod was never really intended for serious photography. It's one of the $20 models that you can buy just about anywhere. While it's better than nothing, it leaves a lot to be desired. One of the first things I noticed after not using it for quite a while was how flimsy and wobbly it actually is. When I had never used anything else it felt just fine, but I now realize that it moves way too easily. When I extended the center column, I actually had to wait for the camera to stop swaying before I took the photo!

So now that you know what I'm comparing my current tripod to, you'll probably think that just about anything would be better. You might be right, but there are a few lessons to be learned from this experience. Read on to lean what they are...

My current tripod is a Velbon El Carmagne 530. It's legs are carbon fiber, which helps to keep the weight down, and the center column is aluminum. The head is a Velbon PH-250B. So what are the glaring differences between this tripod and my old one?


- Height: The Velbon gives me much more height to work with, and it's sturdy through the entire height range. I don't have to worry about a wobbly camera when the center column is extended. The legs also extend out, away from the camera which allows the camera to get to almost ground-level.
- Weight: The Velbon is much sturdier and as a much better head on it, but it weighs almost the same as my old tripod.
- Adjustability: All of the legs can be independently adjusted, giving a stable footing on almost any incline or terrain.
- Head: The head on this tripod is great. Not everyone is a fan of a pan-tilt head (many prefer ball-heads), but I love the fact that I can adjust one axis of movement without affecting the others. It's sturdy and locks tightly. I've never missed a shot because the head has allowed the camera to move.
- The Look: Although it doesn't make the tripod perform any differently, the Velbon definitely looks much more "professional". It also just looks cooler.


Although a tripod is not usually the most lusted-after piece of equipment for most photographers, a good, high-quality tripod should be considered an essential piece of gear. From landscape to fashion photographers, everyone will need a tripod at some point. When that time comes, make sure you've got one that you can rely on. I'm pretty sure if you throw that D3x with your 70-200mm f/2.8 on a cheap tripod and someone bumps it, it's going down and you're not going to have a good day.

Friday, November 6, 2009

Saraya


This weather we're having is just unbelievable! Last week we get almost 2 feet of snow and this week I'm in Fort Collins taking pictures of someone in shorts and sandals! You've just got to love Colorado weather. By the way, that someone was Saraya, a young lady from Cheyenne, WY who made the trip down to Fort Collins for a photo shoot.

We met in Fort Collins but headed up north of town to get a little closer to nature. The Poudre River flows north of town and we found a nice spot that had a trail, big trees and even a wooden bridge. We shot at the bridge for a while and then headed over next to the river with some huge trees as props.

As with all shoots, it takes a little while to warm up and start taking really good, relaxed photos. With Saraya, he initial photos were good but we really started clicking once we got next to the river. Some of her poses even remind me of something you'd see on America's Next Top Model! She was very dynamic and didn't just give me the same pose for 2 hours straight. Because of this, we got a big variety of really good photos.

The day ended with Saraya and her boyfriend (he came along for the ride) having a "swordfight" with sticks. After reviewing the photos we took, I can see that playful nature coming through in her expression in many photos. You can't ask for much more than a beautiful day, a fun-loving companion for a photo shoot and great images when you're done. Thanks, Saraya!

You can see more photos from the shoot here.

Tuesday, November 3, 2009

Tech Tuesdays - Adobe Photoshop Lightroom 3 Beta

I've been a user of Adobe Photoshop Lightroom 2 for the past year. It's an amazing piece of software that not only acts as a database and catalog for all of my photos, but also gives me much of the editing power of Photoshop within the same program. I'm not going to go into a big explanation here about what it does, but I will say that, other than my camera and lenses, this is the most-used "cog" in my photographic process.

When I read on Scott Kelby's blog that Adobe was releasing a beta version of Lightroom 3, I couldn't download it fast enough! He writes some of the most useful and entertaining books about Adobe products and he's a pretty good photographer also, so when he gets excited about the new features in Lightroom 3, I get excited.

I downloaded (get it here) and installed Lightroom 3 Beta (I'll just refer to it as LR3) and have been using it for the past week, alongside Lightroom 2 (LR2), for my daily photo organizing and processing needs. Here are a few of my thoughts:

One of the biggest changes that will make things so much easier is the catalog backup runs on the program close instead of on the program open. In LR2, you sit down, open LR2, you're ready to do some serious photo stuff and LR2 decides it's time to backup your catalog, which takes a few minutes. Now, in LR3, it doesn't do a backup until you close the program. It's so nice to just close it and walk away while it performs it's backup.

Import: In LR2, when you attach a camera or want to import photos, a separate dialogue box pops up and guides you through the import process. In LR3, there is a nice new "From/To" feature that opens in the Lightroom desktop instead of a pop up window. It shows the disks you're importing from on the left side of the screen and it shows your system disks and free space on the right. Some options have been added to the top of the screen for "Copy, Move, Add, Copy as DNG". All of the previous options still remain, such as automatic backup location, develop options and file naming.

Develop: There are a few new brush presets named Teeth Whitening (it works good, but watch out for people's gums... you'll turn them gray) and Iris Enhance (I don't care for it... it does too much and looks unnatural).
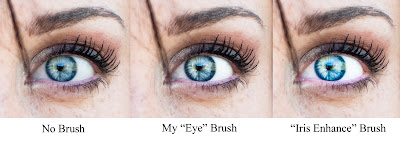


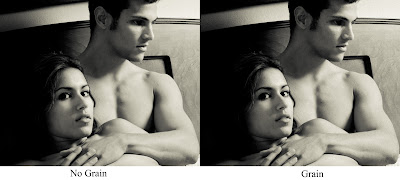
One big change from LR2 to LR3 is that sharpening is applied in real time to the image instead of just on export. Now you can see what your final image will look like before you export it! The spot heal seems to work much faster, but I didn't notice any difference in the results. Another new feature is film grain, which adds a more "filmy" look to photos, especially black and white photos. There's a decent amount of control available, so you can get just the look you want.


Scott Kelby mentioned "drag and drop" publishing to the web, but I couldn't figure it out. I'll keep trying.

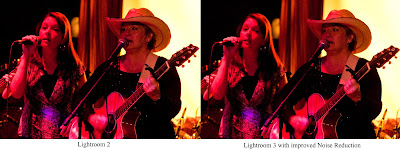
Another big improvement is in the noise reduction. It produces a much more pleasing image from my D90 with an ISO of 3200, with just a little softer details, much better blacks and solid colors. It also makes the noise look more like grain than colored noise. Skin ends up looking better and I found I was able to go higher with the exposure and fill light levels without encountering noise issues.


Export: In the export options, Export to Flickr is now included as a default. It's nice, but not as robust as "Jeffrey Friedl's Flickr Export Plugin". You are only able to export to your Flickr photostream, but not able to add photos to groups or sets like the Export Plugin. On a quick side note, I found that JPG file sizes are larger for LR3 than JPGs exported from LR2 with identical settings.

Another huge improvement to the export option is the ability to export photos with a custom graphical watermark, not just text. In my short time using this feature, it's very useful, giving me the ability to choose the watermark's location on the photo and saving me from having to open every image in Photoshop just to add a watermark. Thank you Adobe!

Web Gallery: There were no new gallery options that I saw, but once again the ability to export with a watermark is available. In the gallery preview, the watermark location appears to be incorrect and move from photo to photo, but the exported version was always correct. One change for the worse is that LR3 seems to be slow to show it's status when exporting. When I clicked Export and didn't see the status bar in the upper-left corner after a few seconds, I thought that maybe I didn't actually click Export. It turns out that it just takes longer to appear than in LR2.

I'm happy to say that after one week of using Lightroom 3, I only experienced one error. A brush got stuck so that anytime I moved the mouse it acted like I was clicking a button. I ended up with about 50 brush clicks, but those were easily undone in the history panel. I switched back to the grid view, selected the photo again, started editing and didn't experience any more problems.

So far, I've been having a great time using Adobe Photoshop Lightroom 3's Beta version. I can't wait to see what improvements the final version has for us. It seems like Adobe's programmers listened to the users of LR2 and came up with some really useful improvements for LR3 without sacrificing the feel or functionality of LR2. If you're an LR2 user, you'll immediately feel right at home with LR3. If you're new to Lightroom, the LR3 Beta version is a fully-functional version that would be great to learn on if you're not sure you want to spend the money yet. I will warn you, though. Once you seriously use Lightroom and make it a part of your workflow, you'll probably find that you can't get along without it and buy the full version. Consider yourself warned.

You can download Adobe Photoshop Lightroom 3 Beta here.

Monday, November 2, 2009

Bouba


My photo shoot with Bouba almost didn't happen. I had a last-minute cancellation and really wanted to fill my schedule, so I posted a Hail Mary listing on a modeling web site looking for anyone willing to shoot last-minute. Bouba responded within about 5 minutes saying that he was willing to shoot on short notice. Thankfully, he turned out to be a great guy to work with!

We met downtown for some business-like shots. Bouba pulled up in his shiny black car and stepped out in his suit. He gave the impression of someone of great importance, but he was as nice as anyone I've worked with. We walked around LoDo, taking photos and trying to find the perfect location to shoot. For not having any time to plan, I think we found some great locations.

Bouba was even willing to do a complete change of clothes to get an athletic shoot in as well! After changing in his car (I think all models are very good at this), he was no longer a businessman... he was an athlete! We headed to a park, got some quick photos and then had to run from the rain. Hopefully, our next shoot will have more notice and better weather. As long as it's anywhere as good as this one was, I'll be happy!

Note: this shoot is from my "archives". I'll have current shoots up later this week.

You can find more photos here.

Thursday, October 29, 2009

Tanya Part III


Seriously? Part III? Yes, I teamed up with Tanya once again for an eventful photo shoot (see my first and second shoots). On this shoot, no one tried to get in the shoot with us and the cops didn't show up. After we were done, I had to ask myself, "was this a normal shoot?". It was normal, except for the fact that Tanya was standing on top of a large hill in an evening dress holding a long piece of fabric and trying not to get blown away by gusts of wind!

Tanya approached me about this blowing fabric idea, but I originally had another shoot planned. I told her that if something happened with the other shoot, I'd be happy to do something if she didn't mind making last-minute plans. Well, something happened with the other shoot and Tanya was happy to work on a tight schedule. We met up, packed our stuff and headed west towards the wind.

If the wind is not blowing in Denver, you can usually bet it's blowing near Boulder. The wind was not blowing in Denver that day, so we drove out towards Highway 93, one of the windiest places on the Front Range. Thankfully, the wind was blowing and I didn't look like an idiot for having us drive so far. I pulled out my camera, Tanya pulled out the fabric and we let the wind do most of the work. I should mention that Tanya was getting quite a workout from holding on to the fabric and just standing upright. I guess I had it pretty easy that day!

After blowing around for a while, we decided to head back to the city and get some more calm shots. We found a nice grove of colorful cottonwoods, set up and spent the rest of our time enjoying the day and taking some great photos. Although they weren't part of the original plan, we are both happy with the photos from the second location, as they're different from any photos we've created so far. For a canceled photo shoot and last-minute planning, I'd say it was a productive afternoon!

You can see more photos here.

Wednesday, October 28, 2009

Julia and Jaden


When I heard that I'd be taking photos of two girls and their new puppy, my first thought was, "this will be hard not to get a good photo". The next time I hear something similar, my first thought will be, "how will I get them to sit still?". Regardless of their energy, Julia and Jaden were lots of fun to photograph and, consequently, we got some great photos.

The weather couldn't have been better for an afternoon in the park. October days in Colorado are unpredictable. Fortunately, we picked a beautiful day! Stephanie (Julia and Jaden's mother) chose a nice little park in their neighborhood complete with a playground and mountain views.

We started on the playground. I just told the girls to have fun and that's exactly what they did. They were both very comfortable with the camera and even gave me some poses when I asked them to. The hard part was getting them off of the playground and onto the grass to pose for a few photos with their new puppy.

Once the girls were on the grass, the next trick was to get the dog into the photos. When that was accomplished, they all needed to look at the camera at the same time. One of the best ways to get kids' attention and to get them to look at the camera is to ask them to make funny faces. Once they do that, getting them to make a nice face isn't as difficult. One of my favorite photos of the day was a "funny face" photo where even the dog is sticking out her tongue!

After about an hour of taking photos, the girls started to get tired. If there's one thing I've learned about photographing children, it's that it's better to end on a good note rather than wait for things to go bad. We decided to call it a day while everyone was still smiling, which allowed us to go enjoy what was left of a beautiful October afternoon in high spirits.

You can see more images here.

Tuesday, October 27, 2009

Tech Tuesdays - An Introduction


As anyone with a hobby knows, you can never get enough of what you love. You'll scour the internet, read magazines and books and join clubs just to talk about your obsession, I mean hobby. Well, I've decided to take care of two things at one time here. I get to talk about my obsession with photography gear and I get to give photographers a new place to read about camera stuff!

So what will I be discussing here? Anything photography related is fair game. I'm planning on doing casual reviews of my cameras and lenses, as well as software, camera gear, books and magazines. I'm a Nikon guy, so if you want reviews of Canon stuff, I'm sorry, but you won't find it here unless I borrow a camera from someone. Regardless of the gear you use, you still might be an Adobe Lightroom user. I'm planning on installing the new Lightroom Version 3, using it for my daily photo processing and letting you know what I think about it. I also get a few (too many?) magazines every month, such as Rangefinder, After Capture, Digital Photo Pro, PDN, Popular Photography, American Photo and Photo Pro Magazine. Expect reviews of all of them eventually.
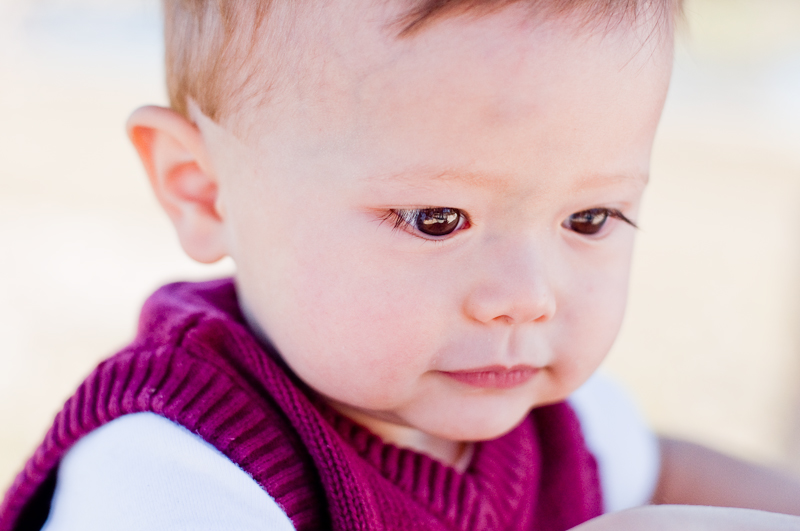
Sometimes it's the little things that can make a big difference. I'll let you know the stuff I never leave home without, like a Lens Pen, or the gear I can't imagine not using, like SanDisk Extreme III memory cards.

Whether you're a casual photographer who just wants a few tips on what to buy next or a seasoned pro who needs a new book to read, I should have some good info for you here. Check back next Tuesday for my first review...

Monday, October 26, 2009

Ning, Lee and Forest


Ning and Lee are one of the nicest couples around. They're fun to spend time with, they both have a great sense of humor, and their son, Forest, is great! We spent some time on a sunny Sunday morning taking some photos on the south end of Denver.

The first thing I noticed was how nice everyone looked. They all wore color-coordinated outfits, but not matching outfits. The second thing I noticed was a big bump on Forest's forehead! Apparently, he just learned to walk and fell down and scraped his head a few days before. He's fine and thanks to the power of Photoshop, you'd never even know it from the photos!

We started off by letting Forest play on the playground, which provided some great photos. After a while, we decided to attempt some family photos. We didn't include Forest in this decision, so he made it clear he wanted to play and not sit still! After some parental tricks (Lee gave Forest his car keys to play with) and a little tickling, we got some great family photos.

At the end of the shoot, Forest was just about done being cute for the camera, so Lee took him over to watch the geese while I took a few photos of Ning. I really like the way they came out. Her haircut framed her face so nicely and the light was great. I hope Forest doesn't grow up too quickly, as I can't wait to spend some time with him (and his parents) again.

You can see more photos here.

Friday, October 23, 2009

Joyce


I met Joyce through a model that I've worked with in the past. Tanya is one of my favorite models to work with and she likes my work, so she wanted to treat her mom to a photo session for her birthday. When she said that her mom was a little nervous about the shoot, I suggested that we grab a beer first just to loosen up a bit. After a beer and some nice conversation it was time to shoot.

The weather was beautiful. Tanya found a great location with a lake right in the middle of town! Joyce looked wonderful and had on some killer orange boots. After getting out the jitters, we settled down and took some great photos. She was even up for an outfit and location change!

Near the end of the shoot we got Tanya and her brother Ben involved and took a few group photos with them as well. Although the idea of this birthday present might have been to pamper Joyce and give her some great photos of herself, I have a feeling her favorites will probably be the photos of her and her kids. That's just the way moms are!

You can see more photos from the shoot here.

Wednesday, October 21, 2009

Tanya Part II


As I write this, my eyes are sore and itchy, I have seeds in my hair and I think I just felt something crawling up my leg. This is not my typical post-shoot condition, but if I keep shooting with Tanya, who knows what I'll be writing about next time. The one thing that makes it all worth it is it's just so much fun! Plus, we always come away with great photos.

Tanya and I had a previous shoot that was amazing. It didn't take us long to set up another shoot. We decided we'd have a bit of a Western theme, so she pulled out the boots and jeans, I grabbed my camera and we headed out to some open space.

Fortunately, the open space was beautiful. It was a nice, warm day. The worst part was the wind. It wouldn't have been so bad if we weren't next to a bunch of plants that were seeding like crazy. The little, fuzzy seeds were sticking to our lips and flying into our eyes, ears, and mouths. Once I saw the photos, though, it was all worthwhile. Once again, Tanya did not disappoint and the photos rock!

Like I said in my last post about Tanya, "it's nice when two people click". Today, I was reminded of that once again. We drove around, talked, acted goofy and took photos. I can't ask for much more than that.

You can see more images here.

Monday, October 19, 2009

Kaysha


Kaysha is a Senior at CSU in Fort Collins. When she saw my photos, she asked me to take some photos of her that showed her on campus and that she could include with her graduation announcements. I thought it was a great idea to do college "senior" photos, so I headed up to spend an afternoon in Fort Collins.

Kaysha wanted to include some of her favorite places on the CSU campus in her photos. One of her favorites is the Oval, a big open space that's full of grass and trees. It's a favorite student location for studying, relaxing and socializing. After some photos in the Oval, we headed up to the railroad tracks that run through campus for some photos. I think Kaysha missed her true calling... a tightrope walker. She was walking down one side of the railroad track in heels!

After working on the railroad, we headed to a few different buildings to capture the colors and textures of the CSU campus. Finally, we ended up at her truck where she traded out her heels for boots and we took some photos with her and her truck. They have a nice, sentimental feel to them. I think she really likes her truck.

What made the shoot with Kaysha so enjoyable was not just her personality and getting to know her, but also the fact that she's a cousin I never knew I had before this summer! This was our first chance to really hang out and get to know each other. It was great to get to know this "new" family member. Maybe if she decides to get a Masters Degree she'll need more photos in a few years!

You can see more photos here.

Thursday, October 15, 2009

Laura


There are many words that can describe Laura: bubbly, spunky, fun, tough... The thing that surprises me is how our shoot lingers in my head and I keep remembering different aspects of it for different reasons.

Laura is a student at CSU, so I headed up to Fort Collins on a foggy Wednesday morning. During our entire shoot, there was a nice, even cloud cover across the sky. This gave us excellent light to work with. Unfortunately, the temperature was pretty chilly and Laura was not wearing warm clothes. It didn't phase her, though. She went strong for over two hours and only really said that her hands were cold. We did notice that her knees were starting to turn purple from the cold, but we said we wouldn't mention that, so forget I said anything...

What really impressed me about Laura was her diversity of poses and facial expressions. She said she hadn't done many shoots before, but I couldn't tell. She's got some talent! I can't wait to see what she's doing in another year or two.

While I was editing the photos, various parts of Laura's personality kept surfacing. This gave me some time to reflect on our shoot and get a better feel for it than I had immediately afterwords. What I've decided is that Laura was a lot of fun to work with, no two shoots with her will be the same and I'll always walk away with good photos when we work together again.

You can see more photos from the shoot here.

Tuesday, October 13, 2009

Laurie and Aidan


Although time and distance can separate two people, it doesn't necessarily have to affect their relationship. I discovered this when I met up with Laurie on Monday. Laurie and I used to work together. We didn't work in the same location or even the same city, but we saw each other at meetings, training and whenever everyone went out for some drinks. We always had fun together, but were also able to talk about some more serious topics. It's been over a year since we last saw each other (we both lost our jobs), but it felt like we picked up right where we left off.

I met Laurie and her son, Aidan, at her house in Erie. She had a location already picked out, so we hopped into her car and headed over. When we arrived, I couldn't have been happier. She chose a trail right by a river, but there were a bunch of open spaces with tall grass, colorful bushes and mossy trees. What a great variety of scenery!

We started out with the "cheesy smiles" and "goofy faces" photos, just to get loosened up a bit. I've got to say, Aidan is the master of the Goofy Face. He can get more different looks out of his face than any kid I've seen! I could tell that Laurie was not as amused as I was, so I stopped encouraging him to make faces, but once in a while when his smile started to look a little forced, I told him to take a break and make some goofy faces. He was more than happy to oblige.

Although the weather was brisk and the light was fading, we were able to get two different outfits into our shoot. Laurie looked great and Aidan behaved himself. We got to spend some time catching up and came away with some great photos. Things will always change: kids grow up, we get older, people come and go from our lives. That's why we take photographs, to remember those moments that we can't get back. But, as I learned with Laurie, it's nice to know that sometimes things don't change.

You can see more photos from the shoot here.

Monday, October 12, 2009

Zoya and Kai


It was a cold and snowy day... wait, didn't I already start a post like that? This time it's the truth! It was supposed to get up to the low-40s on Sunday, but I don't think it ever really made it much above 30 in Boulder. There was snow on the ground, in the trees, and eventually on all of us. Regardless, we took less than an hour on a cold Sunday and got some great photos.

The shoot went great, but it could have been a bad day. First, there was the weather. Then, our meeting place was closed for construction. Luckily, we were able to contact each other, meet at the location for our shoot and get out and start shooting. The kids were very well behaved with just the right combination of goofy and calm.

After posing for some "formal" family photos, we turned the kids loose and let them be themselves. What resulted were goofy poses for the camera, playing in the snow and knocking icicles off of the downspouts. This also gave Zoya and Kai a chance to get some photos alone.

It didn't take too long, though, before hands started to get cold and noses started to drip. We decided we'd rather stop early than try to push our luck. I think we'll have to meet up on a beautiful spring afternoon in Boulder for another, warmer photo shoot.

You can see more photos from the shoot here.

Friday, October 9, 2009

Sasha


Last week Sasha contacted me about taking some photos of her when another photographer decided he was too busy. She said that she was pregnant and wanted to take some maternity photos soon, as she was close to her due date. Thankfully, our schedules (and the weather) worked out perfectly.

We met in Washington Park in Denver on what may turn out to be the last beautiful and warm day of the year. The weather was absolutely perfect. That's good, because when Sasha told me that one of her outfits was going to be a little top and a "sheet", I didn't know how comfortable she would be if it got cold out. Uncomfortable pregnant lady = very short photo shoot!

If anyone was uncomfortable during this shoot, I think it was her husband. He was more than happy to hang out and be my assistant, but when it came time to get him into the photos, he made it known that it wasn't his thing. After some coaching and direction, he got into it and we got a good variety of photos with both of them in them.

At the end of the day, after driving around for an hour (they got lost on the way to the park), two outfits, being on her feet for 2 hours and no bathroom breaks (I offered!), Sasha still looked as wonderful as when she arrived. I was surprised at her stamina! She had fun, she kept laughing and most of all, she radiated a warm, caring glow throughout the entire shoot that came through in the photos. I think she's going to make a great mother.

You can see more photos here

Wednesday, October 7, 2009

Malliga and Matthias


It was a cold and rainy day... well, it was kind of cold and not really rainy, but there were a few sprinkles. Anyway, I met Malliga and Matthias at Washington "Wash" Park in Denver for some photos. Anders, their dog, came along so that he could play in the park and get in a few photos as well.

The weather couldn't really decide what it wanted to do, so we kept taking our jackets off and then putting them back on again, which makes for a nice variety of outfits in the photos. We kind of did the same thing with the photos: take a few here, take a few there... once again, great variety of photos!

I would have to say the highlight of the day was when Malliga wanted some photos on the playground swings, but there were a few girls on the swings already. One of the girls was just standing there, not even swinging, so Malliga acted mad and said she was going to kick the girls off of the swings, but I'm pretty sure she went over and nicely asked if they could use the swings for a bit. The girls agreed and moved, we took some photos, and when we were done we thanked the girls for moving so the grown ups could play.

Near the end of the shoot it started to get really cold and felt like it could rain at any moment, so we decided to wrap things up a little earlier than we had planned. We still got some great photos from the day. I had fun and learned a few things. Malliga and Matthias are very happy with the photos. Sounds like a good day to me!

You can see more photos from the shoot here.

Monday, October 5, 2009

Rachel


When you meet someone for the first time and they ask you within the first five minutes of knowing you if you've ever watched a certain TV show because "you seem like the kind of person who'd enjoy it", and then it turns you decide to watch that show and it turns out to be pretty much your favorite show of all time, there's something special there. That's exactly what happened the first time I met Rachel.

Since then, we've been able to hang out a few times and we always have a great time, so I knew this photo shoot would be a lot of fun. We decided to head up into the foothills around Boulder and see what we could find. What we found was a great little spot that had big rock formations, some trees and overlooked the city.

After taking some photos there, we headed back down the mountain until we found a small building with a very Autumnal-looking tree next to it. Although we got some great photos at the first location, in my opinion the photos we got here were the best of the day. There was something about the light, color and texture that all combined to make some amazing photos.

At the end of the day, we headed back to Rachel's house in Boulder. We walked away with some great photos. More importantly, though, we walked away better friends than when we started. Thanks, Rachel!

You can see more photos from the shoot here.

Sunday, October 4, 2009

Christie


On Friday I headed north to Fort Collins for a very colorful shoot. From the greens and yellows of the trees to the blue of Christie's eyes, it would have been pretty hard to take a bad picture, so luckily I came away with some amazing photos.

The morning started out a little cold, so we had to take a few breaks just to warm up at the beginning, but eventually the sun warmed up and we really hit our rhythm. Christie was a good sport, climbing on logs, walking through a bunch of tall dead grass and even sinking into some swampy ground, all while wearing heels! Her constant smile (at least when we weren't taking photos) and pleasant conversation helped to make the cold more bearable.

The features that really stand out about Christie are here eyes and freckles. She told me that one photographer edited out all of her freckles in the photos he took of her, so I made sure to get some great shots of her face, freckles and all. Looking at the photos, though, it should be obvious that you'd have to be crazy to not take a few good photos of her face. She's got some of the most amazing blue eyes I've ever seen!

Towards the end of the shoot, things always start to get a little relaxed and goofy. We were by a lake and she was saying that she'd love to catch a duck and get some photos with it. We weren't able to get close enough to any ducks this time, but maybe next time we'll find a feathery friend for Christie to pose with!

You can see more photos from Christie's shoot here.

Wednesday, September 30, 2009

Tanya


It's always nice when two people click. It makes working together so much more productive and enjoyable. After my shoot with Tanya in downtown Denver, I think the photos definitely support this idea.

It started off on a good note. "Do you want some coffee?" "I don't care, do you?" "I don't care." "Uh oh, are you one of those people who has a hard time making decisions?" "Yes, are you?" "Yes." "Should be a fun shoot." It's nice to start off with a little humor and common ground.

We had been planning on doing a "summer" shoot while it was still warm outside and the grass was still green. We had originally planned on last Tuesday, but with a high of about 50° and rain, that's not great weather for a summer dress. This Tuesday, the weather cooperated perfectly (although it was a little chilly first thing in the morning). We got our summer shots, she didn't get blinded by the sun too much, and didn't even get very wet from laying in the grass (the park had watered the night before).

Once we were done with the summer portion of the shoot, she changed into business dress for some "professional" shots in LoDo. We shot in quite a few different locations, a few construction workers enjoyed watching Tanya do her thing and I almost got a guy's phone number ("potential model" giving us a hard time). We were done by noon. She had a hair appointment (she's a stylist), I had to go scout a new location, and it was getting hot.

Fortunately, I think the photos turned out great and so does Tanya. She even says I'm her new favorite photographer! All I have to say is that if she were to call me up right now and want to go shoot somewhere, I'd only have two words to say to her: When and Where?

You can see more photos from Tanya's photo shoot here.