Thursday, December 31, 2009

2010 Resolutions


So I lied. This will be my last post for 2009.

I was thinking about some things I wanted to accomplish in the next year and thought, "I should make some New Year's Resolutions.". Then I thought, "Hey, that might make a good blog post!". So, here we go... my resolutions for 2010.

- Stop apologizing for my camera. I have a Nikon D90. It's not the top of the line camera. It's really not even considered a "pro" camera. But you know what? It's awesome! It does everything I want it to do, it's never missed a shot and it takes great photos. I'm sure when I get a new camera I'll upgrade to a pro body, but for now, I love my D90 and will no longer refer to it as if it was a lesser camera.

- Get organized. The most basic but most complicated task. I'm pretty sure this one is sink or swim. Get organized or get out.

- Learn to "read" photos for lighting. This is a very personal goal. In an attempt to grow and develop my skills in the studio, I want to look at a photo and be able to figure out how it was lit and recreate that setup. I see much frustration but many great rewards in my future.

- Grow and maintain my network. I'm really bad at this. Just about anything will be an improvement.

- Get out and shoot more! It's so easy to dig around the house or walk out into the yard and find something to take a picture of. I need to get in the car, drive somewhere and photograph this amazing state that I call home!

There you have it. Those are my five resolutions for 2010. Hopefully they'll develop into some good habits that last for many years to come. Have a safe and happy New Year!

Wednesday, December 23, 2009

Happy Holidays!


Yesterday's post will be my last post for 2009. I'll resume posting the first week of January, 2010. Look for lots more studio shoots, as I plan to start working in a studio in January, plus reviews of all of the lenses I currently use.

Enjoy the last week of 2009 and be safe!

John

Tuesday, December 22, 2009

Tech Tuesday - Nikon Wireless Remote ML-L3


It's probably one of the cheapest camera-specific items in my camera bag. It's tiny, has one button and only costs around $15. This is an item I use very frequently and I'm not sure what I'd do without it. Nikon's ML-L3 wireless remote is, to use a popular phrase, worth it's weight in gold.

The ML-L3 weighs about half an ounce and is hardly bigger than an SD card. If you slip it into your pocket, you won't even notice it's there. It doesn't take up any space in your bag, but make sure you put it somewhere where you can find it!

The ML-L3 isn't fancy. It's got one button that, when pressed, triggers the shutter. That's it. It's an IR remote, just like the remote control for your television, so it requires line of sight to operate. With that being said, I've used mine from many different angles, including in front of and behind the camera and at a distance of up to 15 feet. It will work on the D40, D40x, D60, D80 and D90. For models above the D90, you'll need the MC-36, which is a wired remote that offers far more options.

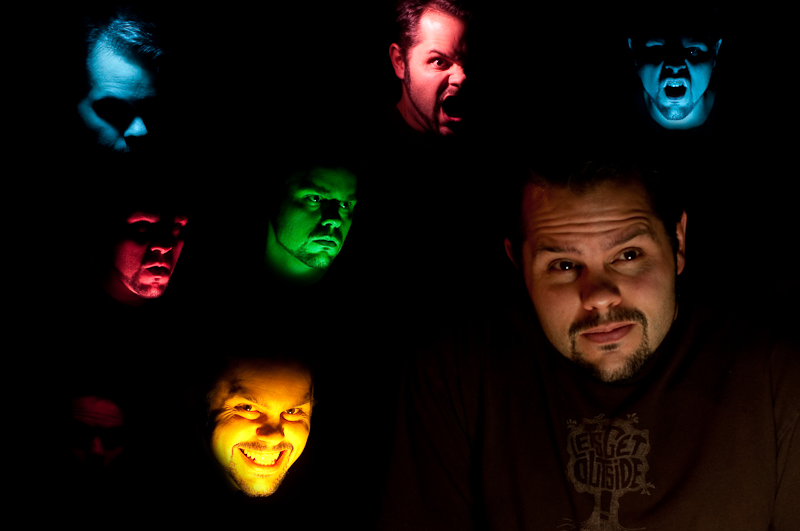
So what do I use the ML-L3 for? Just about anytime my camera is on a tripod, the ML-L3 is in my hand. I use it for macro work. I use it in conjunction with Live View when the camera is in an awkward position. I use it for self portraits. The image below would have been much more difficult without a remote. If I had to time every face with a timed shutter release, not to mention running back to the camera after every shot, it would have taken much longer to shoot, but with the remote, I could just press the button a few times, make a few faces and just stop once in a while to check exposure or change colored gels.


There's not really much more to say about this. It's a wireless remote. You push the button and it takes a picture. It's super small, super lightweight and super inexpensive. If you've got a camera that it will work with, there's no excuse for not having one of these in your bag or pocket at all times.

Friday, December 18, 2009

The Big Studio Shoot


On Tuesday, I discussed my big leap into working in a studio. While the lighting stuff is pretty cool (OK, maybe just for photographers), how about the actual shoot? How were the models to work with? What were some of the ideas behind the shots? How was the mood? What's it like to be at a photo shoot with so many photographers and models? Today I'll give you the inside scoop!

The shoot was set up by Jay Kilgore as part of Colorado SuperShoot. It was basically a big photoshoot party for everyone he's worked with through Colorado SuperShooot in the last year. The morning shoot was a lingerie shoot, which is not what I normally do but I'm not going to complain. The afternoon shoot was a fashion shoot. By the end of the day, there were over 20 models to work with. Some of them tended to stand out, maybe due to their personality, maybe due to their skills. I'll post separate posts about them at a later date. Today's post is just about the experience, and what an experience it was!

The morning lingerie shoot was a lot of fun. I'm not just saying that because there were a bunch of models standing around in their underwear! Everyone was very relaxed. No one was uncomfortable. The music was turned up, people were dancing and laughing, and we were getting some great photos. Here's a tip: If you're getting good photos, show them to your subject! Regardless of whether you're an experienced model or if it's your first photo shoot, having a photographer say "These photos are looking great!" and just keep shooting does not compare to hearing that and then actually seeing the photos. It's an instant boost in confidence! Plus, there's been many times I've thought the photos are looking great, but when I show them to the subject they notice something they don't like and then change it, making even better photos.

We eventually had 4 different locations for shooting in the morning. For some reason, that wasn't enough for me, so I asked if anyone wanted to step outside and shoot against the side of the building. Keep in mind, it's 40° and windy outside and everyone is in lingerie. Kat stepped up and volunteered! We didn't stay outside long, but we did get some great shots. Once we came back inside, it was just constant shooting for the next few hours. The photographers and models all slowly cycled through the different setups so everyone got to shoot everywhere.

Eventually it was time to move into the fashion part of the shoot. More models started to show up and the ones from the morning changed. The photographers decided to change a few of the setups, so while the models got ready we moved equipment around. Fortunately, the kind people at the North Denver Photography Studio let us spread out into the other studios, basically giving us access to the entire place. This opened up so many different possibilities for shooting, it was a little ridiculous! Suddenly we had scenery, props, backdrops and more equipment. It was time to shoot!

Because we got so spread out, we had the flexibility to tweak the lighting so that it looked the way we wanted. Instead of shooting the same person with the same lighting setup as 5 other photographers, we had the chance to create something unique. Some of the models, like Caleb and Brandy, really took this opportunity to voice their opinions and help to create some great images. For all of this, I am grateful to the studio and the models.

At the end of the day, after working with so many different people in so many different locations, I had taken lots of photos, and when I say lots of photos, I mean, "Wow, when am I going to have the time to edit all of these photos?". What really makes me happy is that it wasn't like a production line: Pose... shoot... next! Pose... shoot... next! There was interaction. Contacts were made, stories were told and laughs were shared. Everyone seemed to get along and have a good time. Really, isn't that what it's all about?

You can see more photos here.

Tuesday, December 15, 2009

Tech Tuesdays - Lights, Strobes and Modifiers


First off, let me make it clear that I'm no expert when it comes to studio lighting. I've always been a little intimidated by it, mostly due to lack of experience. With that being said, there's no way I'm going to write a comprehensive study of studio lighting techniques today. Instead, I'm going to give a "fist impression" of my crash-course in lighting I received this weekend.

I was fortunate enough to attend a year-end party/networking event for local photographers and models. It was held on a Saturday in a large studio that had lots of different locations and lights that we could use. Having lots of lights, lots of space and lots of models to work with is an experience that can be very overwhelming or extremely rewarding. I was richly rewarded.

There were many different lighting setups that I was able to use, but I'm going to focus on four of them here. They include a softbox, a strobe with a honeycomb grid, a beauty dish and a hot light in a softbox. They all have their specific uses and they can all give different looks. Here's my take on each one...

Softbox:
This is probably the most common studio light. Take a big flash, put it inside of a fabric box to diffuse and shape the light and you're ready to make some pretty pictures. Depending on the size of the softbox (they can range from 2'x2' squares to 8' octagons and larger), the light can either light a specific part of a subject or fill an entire room. Most of the setups on Saturday used at least one softbox. The image you see below used the same setup as seen in the above image, which was three softboxes (two of which you can see). The two that are visible on the sides of the photo were used to "rim" the subjects and separate them from the background. The main light was provided by a large (maybe 4'x4') softbox in front of the scene.


Honeycomb Grid:
This is a specific attachment that goes on a strobe. Instead of putting the strobe in a softbox to soften the light, it's left exposed which gives a much harsher light. If you just fire a strobe, though, the light tends to spread out and light everything in front of it. By attaching a honeycomb grid to the front of the strobe, the light is focused into a defined beam of light (somewhat like a snoot, but the light is not as shaped and defined). It almost gives a spotlight effect. In the image below, you can see how quickly the light falls off into darkness. The hardest thing about shooting with this light was the if the model moved just a bit, they quickly moved out of the light and into shadow.


Beauty Dish:
This is another attachment that goes on the front of a strobe. It also shapes and directs the light, but it gives a much different shape of light. It's basically a big, shallow bowl that gently throws all of the light on your subject but without the harsh edges of a honeycomb grid. It's called a beauty dish because it produces a very flattering light source. I was able to use this one light to create the three images you see below. The first was shot almost directly in front of the beauty dish, which gives nice, even lighting. The second was shot off to the side, which gives a little more dramatic shadows. The third was shot much closer to the dish and with it placed to the extreme side of the subject. It also had a "sock" over it to diffuse the light (much like a softbox). One light, three very different looks. This might be my favorite light modifier.


Hot light:
If the beauty dish is my favorite light modifier, the hotlight might be my favorite light. I have lots of experience working with natural light. In some ways it's easier because what you see is what you get. The sun is a constant light source. A hot light is also a constant light source. It's really just a big, bright lightbulb. You turn it on, you set your camera to whatever you want without worrying about strobe sync speeds and lighting ratios, and you shoot. When placed inside of a softbox, a hot light produces some absolutely gorgeous, soft light. The shot below was taken with a hot light placed inside of a softbox.


Before Saturday, I would say my experience with studio lighting was minimal at best. Now that I've had time to get inside of a studio and really play around with different lights and modifiers, I think I might be hooked. There is so much possibility and so many options once you're in the controlled environment of a studio, you are only limited by your imagination (and budget). Don't get me wrong, I'm not going to quit taking photos outdoors. Instead of that being my only option, I'll consider using a studio an option as well.

Tuesday, December 8, 2009

Tech Tuesdays - Snoot!

Photo credit: Flickr user - morberg

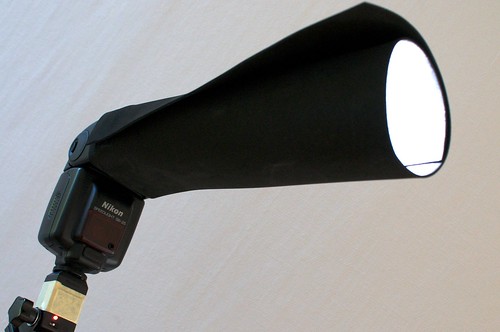
Photography is all about light. If you can control light, you can improve your photographs immensely. One way to control your light is with a snoot. What is a snoot? A snoot is simply a long, narrow attachment for the end of your flash or strobe. Instead of light "spraying" out of your flash, a snoot shapes and controls the light into a narrow and well-defined "stream". Imagine how water gushes out of an outdoor faucet when it's turned on. Now, attach a hose to that faucet and you have a nice, controlled stream of water. That's what a snoot does!

You can purchase snoots of all shapes and sizes, but you can also make your own very easily. For my hot-shoe flash, I use a heavy cardboard tube that's about 16" long. The flash fits inside of it perfectly and the light that comes out the other end is quite nice. Not too bad for free, right? You can also just roll up paper or use gaffer tape to make a quick and custom snoot. Sure, you can always buy one, but free is good! I'm sure if I used larger studio strobes I wouldn't want to bother making my own snoot, but for a hot-shoe flash, it's really easy to do.

So why do you need to control light? What's wrong with just using a flash as a flash? If you want to create a spotlight effect where an object is bathed in a pool of light that is surrounded by darkness, you might just need a snoot. If you want to light just a portion of your subject without lighting the rest, you might just need a snoot. If you want to create dramatic light without a bunch of spilled light reflecting and filling your dramatic shadows, you might just need a snoot. If you want to shoot a beam of light through a column of smoke without letting any light touch the background so that only your smoke is lit, you might just need a snoot.

Here are a few examples of images take with and without snoots:

This image was taken with a snoot on the flash. Notice how there is mostly just light on the angel and not much on the surrounding table? With an even smaller snoot, I could have just lit the angel.

This image was taken without a snoot on the flash. The light was not focused and therefore hit the angel and the table. Furthermore, the extra light that hit the table bounced back up and lit the angel even more than I wanted.

If you're not convinced that you need to buy a snoot, try making one! All it really takes is some paper and tape. If that's all it takes to push your images to the next level, you'd be crazy to not try it!

You can see more images in which I've used a snoot here, here , here and here. You can also just search for "snoot" on Flickr to see the variety of images you can produce with such a simple tool and a little creativity.

Friday, December 4, 2009

Cami


What's up with me lately? As you might remember from Victoria's photo shoot, I didn't recognize her when she showed up. Once again, I've proven to be Mr. Non-observant. I met Cami in Fort Collins and she texted and said she was almost to the coffee shop where we were planning on meeting. I headed over to the coffee shop and waited outside... in the cold... for about 15 minutes. I thought I'd catch her when she got to the shop. It turns out she beat me to the shop and she was already inside. To add a bit more irony, she was sitting right by the window that I was sitting on the other side of. I kept thinking, "that sure looks like Cami, but it couldn't be." It was.

Once we got that straightened out, we headed to our location and started shooting. I had found the location on an earlier shoot and made a note to re-visit it. It had lots of tall grass, dead trees that had fallen over and a little creek running through it. It was just about the perfect location for an autumn photo shoot.

We started a little later in the day to get the best light possible. Cami was awesome. She took direction very well in order to take full advantage of the light. She had a good variety of looks and poses. She wasn't afraid to move around and use all parts of the location, even if it meant getting a little dirty or cold.

After an outfit change, the sun started going down fast. This gave us the best light of the day, but it started to get cold quickly. Once again, Cami came through and we got some excellent photos.

While I was editing the photos, I realized that these are some of my favorite photos I've taken in a while. I've really enjoyed all of my photo shoots up to this point, but all of the stars lined up for this shoot. Between the location, the weather, the sunlight and Cami, these photos just worked. Thank you Cami for a great shoot and great photos!

You can view more photos here.

Tuesday, December 1, 2009

Tech Tuesdays - SD Memory Cards


In photography, it's all about getting the shot. Sometimes, getting the shot can mean being ready at the right moment. In business, time is money. The less time you spend on non-productive tasks, the more time you can spend on making money! Can something as simple as a new memory card help you to get more shots, not miss a shot and save you hours a year? If you buy the correct memory card, the answer is yes.

Today I put three different memory cards to the test. All are made by SanDisk, probably the most popular memory card manufacturer around. Since my D90 takes SD cards, that's what I'm testing, but I'd assume the numbers would almost directly correlate to CF cards as well. I decided to put each card through three different tests...

- Test 1: Shoot RAW + JPEG continuously for 30 seconds. Results show number of images recorded.
- Test 2: Shoot JPEG only continuously for 30 seconds. Results show number of images recorded.
- Test 3: Upoad 1.09 GB (188 RAW + JPEG images) from card to hard drive. Results show minutes:seconds it took to upload.

Here are the cards I used...

- C1: SanDisk (Class 2)
- C2: SanDisk Ultra II (Class 4)
- C3: SanDisk Extreme III (Class 6)

All of the shooting tests were carried out on a static scene with the same camera settings: f/8, 1/100 sec, card formatted before each test. The D90 apparently has a 100 JPEG limit, so it filled up in 2 of the 3 JPEG only tests, but there was still a difference. Here's the numbers:

Test 1: C1 - 15, C2 - 29, C3 - 41 (images)
Test 2: C1 - 47, C2 - 100, C3 - 100 (images)*see note below
Test 3: C1 - 1:45, C2 - 1:44, C3 - 1:08 (minutes:seconds)
* Although C2 and C3 were both able to record 100 images in 30 seconds, the camera buffer filled up with C2 and shooting was not truly continuous, while the camera buffer never filled up with C3, providing a truly continuous shooting experience.

So what do these numbers mean? To put it simply, you'll get more photos, rely less on your camera's buffer and upload photos more quickly with a faster card. To break it down a bit more, let me give a bit more detail for a few of the statistics.

When I was shooting Test 1, as soon as the camera buffer of 7 frames was filled, C3 continued to shoot, write and then shoot again fairly quickly. I wouldn't mind using it for bursts of more than 7 photos. When using C1, on the other hand, there were a few seconds of writing time after the buffer filled. If you tried to use this card on a fast-moving object, after 7 images you'd miss everything else while the first 7 images were being written from the buffer to the card.

On Test 2, the buffer filled fairly quickly when shooting with C1. With C2, it shot for at least 10-15 seconds before the buffer was full, but it still shot fairly quickly, allowing me to shoot 100 images in 30 seconds. With C3, I never filled the buffer and shooting never slowed below the max FPS rate.

For Test 3, I was surprised to see that C1 and C2 both took the same amount of time to upload from the card. What was not surprising is the amount of time it took to copy the files from my computer to the card. I almost wrote this entire article while waiting for the data to go from computer to C1 (OK, that's a bit of an exaggeration, but not much!).

When you look at the price difference between a Class 6 card and a Class 2 card, it's easy to convince yourself that it's better to save money on a memory card and spend it on a new lens or something like that. What I've learned is that you almost always get what you pay for and if you're serious about shooting action and don't want to wait forever while your photos upload, spend the extra money and buy yourself a fast memory card. You'll be amazed at the difference!