Monday, May 17, 2010

Paul and Carissa


When Paul, Carissa, Ryan and Amelia-Rose showed up at the studio I knew we were going to have a fun day.  Even though they were dressed nice, they had a great, relaxed attitude and didn't want a "formal" family photo.  Instead, they wanted to look nice but still be themselves. What followed was a very fun shoot.

We started out with some nice, safe posed shots.  It didn't take long for Ryan and Amelia-Rose to lose interest in that, though, so I tried to keep moving through different looks and poses just to keep things moving.  Well, the kids certainly helped keep things moving... they didn't stop moving!  Not that that's a bad thing.  Just look at the photo at the top of this post!  This kind of shot would never happen if we forced the kids to sit still and look at the camera.  If we had tried to do that, we'd have ended up with grumpy kids and a short photo shoot.

After a while it became clear that we were done with family photos and it was time to get some photos of the kids being kids.  I'm not sure what it is about the studio, but I think when children see a big, empty white room they instantly think "Let's go crazy!".  It happens every time.  Kids just love the studio!  Ryan and Amelia-Rose were no different.  They were running laps around the props and just had fun playing with each other.  I think they were oblivious to the camera.

We wrapped up the shoot with a little game where they would hide behind a riser and then pop out and scare me.  Of course, I'd take a picture every time before I got "scared".  It's always fun finding games you can play with the kids and give the parents a bit of a break.

At the end of the day, we got some good photos.  Paul actually went to college with my wife, so we also got a chance to catch up on the last few years.  At this shoot, Carissa was pregnant and she's since given birth to a healthy boy.  Hopefully we'll get some photos of him on here soon!

You can see more photos from this shoot here.

Tuesday, May 11, 2010

Tech Tuesdays - Reflectors


Sometimes using a reflector can make or break a photo. For example, if you only have one light source that you're using, whether it's a strobe or a window, you'll probably end up with a pretty contrasty photo with bright highlights and dark shadows. While this look can be a good thing, it's not always what you want. By using something to reflect a bit of light back into those shadows you'll get a photo that's much easier to look at and much kinder to your subject.

So what is a reflector? A reflector is anything that reflects light. Sounds pretty obvious, eh? All too often, though, us photographers get caught up in the gizmos and gadgets of photography and just think of a reflector as something made by Lastolite or California Sun Bounce that costs a lot of money. Those companies make reflectors in all shapes, sizes and colors, but those aren't your only options for reflecting light.

One of the cheapest reflectors you can get is a piece of paper. Yes, a plain white piece of copy paper. While it's not necessarily big enough to use in a portrait session, it can work wonders for product or macro work. Just fold it into a tent, set it next to your product and you've got a nice source of reflected light!

If you're shooting something bigger, like a person, you can use large pieces of foamboard, styrofoam or even a bunch of pieces of paper taped together! All of these items can be pretty tough to use in the wind, but in a studio they work just fine.

You'll notice that everything I've mentioned so far is usually white. When you're reflecting light, a white surface will give you a nice, soft light that doesn't affect the color of the light you're using. If you happen to use green paper as a reflector, it will still reflect light onto your subject, but it won't reflect as much as white paper will and it will turn the reflected light green, which will turn your subject green. You can use something that's silver, but it will cast a harsher light than white will. I would avoid using a mirror. Even though mirrors are about as reflective as you can get, they are not generally recommended for use as a reflector unless you need a very harsh and direct light.

Now, how about the size of your reflector? When you reflect light, you're essentially creating a new light source. As with any light source, the smaller it is the harder the light it creates and the larger it is the softer the light it creates. Keep this in mind when you're choosing your reflector.

The distance you hold your reflector from your subject also matters. Because light falls off exponentially as a light source gets farther from a subject, and reflected light is already weaker than the light source, you'll have to get your reflector pretty close to your subject to see a difference.

In the photos below, the light source did not move for any of the photos and the camera settings did not change. The only changes I made were in the use of a reflector and how far away I held it.

In this image, I didn't use a reflector at all.  Notice how dark the left side of the face is.

In this image, I used a half-sheet of white paper and held it the same distance from the left side of the face as the light source on the right side of the face.

In this image, I used a half-sheet of white paper and held it half the distance from the left side of the face (closer to the face) as the light source on the right side of the face.  Notice how much more fill-light there is.

 In this image, I used a large 2x4' piece of styrofoam and held it the same distance from the left side of the face as the light source on the right side of the face.  Notice how much more the light wraps around the face compared to the smaller piece of paper that was held at the same distance.

In this image, I used a piece of black paper and held it the same distance from the left side of the face as the light source on the right side of the face.  Notice how there is even less reflected light than when there is no reflector.  Black "reflectors" just suck up the light.

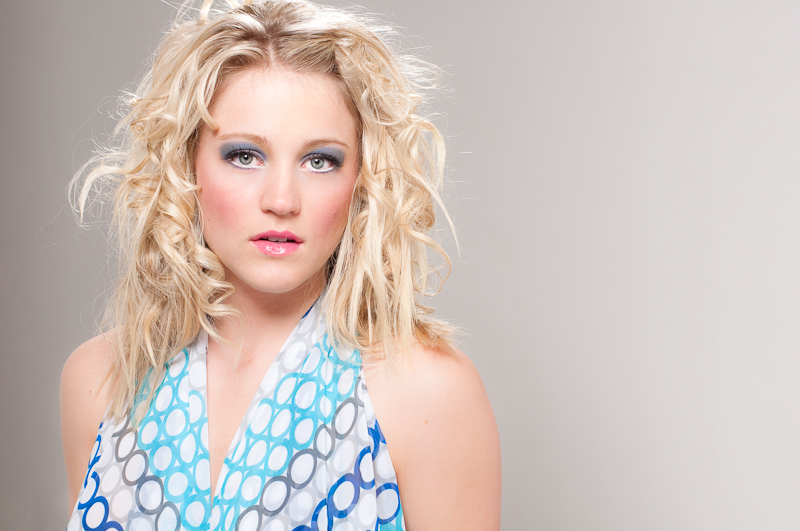
In the real world, sometimes you have to improvise. In the photo that leads off this article, you'll notice that it looks like there are highlights on the model's face. There are, but not from any direct light. This shot was taken right around 2pm on a sunny Denver day, but we were standing in the shade of a bridge. If you look at the reflections in her eyes, you can see the large sidewalk that was right in front of her just reflecting all that wonderful sunlight into her shady face. Without that reflected light, this photo would be pretty flat. As long as you keep your eyes (and your options) open, you never know what kind of reflectors you'll find!

Thursday, May 6, 2010

Fashion Denver Shoot


A few months ago I wrote a post about a shoot I did in Colorado Springs with Gary from Imagery Light. I told him that I'd return the favor and we'd so a shoot in my studio here in Denver. Well, after about a month of hard work, we finally got to do that shoot. What was involved? We had 11 models, 1 hair stylist - Tanya, 1 makeup artist (MUA) - Jacki, 1 wardrobe assistant and clothing for everyone provided by a local shop. Add a few photographers to that mix and you've got a full studio and a long day of shooting!

First, let's start with the setup for this shoot. Once we picked a date, I knew it would take a bit of time to get everything lined up, so I started a month early. I made sure I had a hair stylist and MUA lined up. Once that was done, I thought it would be fun to try to utilize a recent connection I had made and get some wardrobe for the shoot. That worked as well, so now that I had all of the details lined up for the shoot, I posted a casting call. I didn't want more than about 10 models, but I also figured that a few might drop out over the course of the month or just not show up on the day of the shoot, so I was hoping for 12 confirmed models. The response was huge and I had to pick from about 35 models who were interested! Once I had it narrowed down, I started confirming and eventually had 12.

Fast forward a few weeks, a few phone calls and many emails to the day of the shoot. Gary and I arrive at the studio around noon to start setting things up. Tanya and Jacki arrive shortly after so that they're ready when the models arrive. The first models arrive around 12:30 and go right into hair and makeup. The plan was to start shooting around 1pm, but we started falling behind right from the start, so we didn't start shooting until almost 1:30. No big deal, except for the fact that we have a steady stream of models coming in all day long and they end up waiting longer than I would have liked. By the end of the day, everyone has shot and everyone seems happy. Gary and I tear everything down and are out of the studio by about 7pm. We head off to get some Thai food and discuss the shoot.

Now how about a few details? Tanya Owens did the hair for the shoot and she did a fabulous job! She decided to go a little more high-fashion and came up with a variety of styles that both fit the models and the outfits. Jacki (aka Belle Amore) did the makeup for the shoot and also did a wonderful job of matching the makeup to the outfits. The colors and styles she used keep getting rave reviews from everyone who sees them. The star of the show was the wardrobe, which was provided by Fashion Denver. Brandi Shigley is the owner of Fashion Denver and she held a special fitting before the shoot so that each model could choose an outfit that they wanted to wear, along with a bunch of accessories to go with it. Without her support, this shoot would have turned out much different than it did.

When all was said and done, we had 11 models show up and Tanya got in on the action as well, so the schedule was very tight. Everyone got to change into an outfit that they brought with them as well, so we essentially shot 24 different looks during the day across three different lighting setups. It was a lot of hard work and a very long day (and many days of editing photos during the next week), but it was tons of fun and totally worth it. Now... I think it's time to start planning the next big shoot!

You can see more photos from the shoot here.