Wednesday, November 25, 2009
Charlie
When Rob and Kathryn asked me if I'd take some photos of their son, Charlie, I was super-excited. I had never taken photos of a child as young as Charlie, so I was ready for the experience. I might have been spoiled from my first experience, though, as Charlie is a very cute baby and was quite well-behaved!
I arrived at Rob and Kathryn's house in an older neighborhood of Boulder. The south side of their house had been remodeled by a previous owner, and part of that remodel included lots of windows. Because of the windows, there was plenty of natural light available to work with, so we just set up a little cozy area for Charlie out of the direct sun and I started taking photos.
I must admit, I was surprised at how well-behaved Charlie was. He was alert, wasn't fussy and was basically the perfect subject. I think he would have been fine to lay there for hours if we hadn't decided to change his outfit. Once the outfit was changed, our groove was gone and he got a little fussy. Fortunately, it wasn't a big deal and we still got some great photos of him in his next outfits.
The grand finale came when we let the dogs come in for a closer look at Charlie. Typically, they're always getting close to him, checking him out, and even sneaking in the occasional lick. For our photo shoot, they were on their best behavior and even when we invited them to come visit Charlie they were hesitant. We finally got a few photos of him and the dogs after much coaxing and patience.
This might have been my first photo shoot with an infant, but I know it won't be my last. Thank you, Charlie, for being such a good little guy. I hope to work with you again soon!
You can see more photos from the shoot here.
Tuesday, November 24, 2009
Tech Tuesdays - Rangefinder Magazine
I love magazines. It's no secret. At any point in time I probably have at least 5 unread magazines laying around the house, usually many more. There are few things I have a hard time not purchasing, but anytime I'm in a bookstore I rarely leave without a new magazine to add to my "to read" pile. I have a few non-photography related magazines, but the majority of them are about photography. The only problem with magazines, especially the ones that are printed overseas, is that they are quite expensive.
Now, imagine that you love magazines, that you're very picky about magazines, that you don't want to waste your time on filler and advertisements and on information that you already know. Imagine that I tell you that there's a magazine that has loads of great, useful, current information that pertains to you, an avid and possibly professional photographer. Imagine I tell you that every single article in this magazine is worth reading and that the articles are long and well-written. Sounds pretty good, right? Now imagine I tell you that it's free and will be delivered to your mailbox every month. All you have to do is sign up online.
Free? The only free things that come to my mailbox for free are not worth reading. They get one look and then get recycled. Plus, there's got to be a catch, right? I'll end up on a bunch of junk mail lists. It will be printed on cheap paper and get torn up in the mail. Things like this do not exist anymore. Imagine I tell you that you're wrong.
Rangefinder Magazine has got to be one of the most well-kept secrets around for a photographer. It is truly a free magazine that is full of great information. You won't end up on junk mail lists, or at least I haven't after close to a year. It's printed on high-quality paper and it shows up every month looking great. Out of any photography magazine I've ever read, Rangefinder is probably my favorite and by far the most useful.
A typical issue of Rangefinder includes about 3-5 long articles about photographers. Each issue has a theme and the photographers all work within that theme, so one month might be Fine Art and the next might be Black and White. In addition to the articles about photographers, there's also articles about industry trends, new gear, software, news and events. Most importantly, though, it's written for professional photographers, so almost every article has a focus on running and improving your business.
To be quite honest, I could pull out example after example of the great content and writing that you'll find in this magazine, but since you have nothing to lose by subscribing to it, I suggest you just sign up and wait for your first issue to arrive. If you don't immediately devour it and wait anxiously for your next issue to arrive, you'll have more options soon. I'll be posting many more magazine reviews in the coming months... just as soon as I read through my pile.
You can subscribe to Rangefinder Magazine here.
Labels:
Denver,
gear,
review,
Tech Tuesday
Thursday, November 19, 2009
Victoria
They say you don't get a second chance to make a first impression. Does it count if neither of you knew it was your first impression? Victoria and I had never met before, but I had seen photos of her online. We were both in the right place at the right time for our shoot, but she didn't know me and I didn't recognize her (her hair was different). Luckily, we finally figured it out and started with our shoot.
We started off down by the river in some trees and bushes that had all lost their leaves. The patterns and textures they provided with the sun shining through them looked amazing as a background. These are some of my favorite back-lit photos that I've taken.
While the sun was setting, we decided to take advantage of "the Golden Hour", or that hour right before the sun sets where the sunlight takes on a very warm, golden color. Instead of using the sun to backlight Victoria, she turned towards it and let it's warm color light up her face. I hadn't had much experience photographing people in this light, but after seeing the results I'm going to schedule more shoots for sunset!
Before the sun completely went away, Victoria changed outfits one more time. This was a much edgier outfit, so we found a brick wall that the sun was drenching in the last orange light of the day. She had some awesome poses that were enhanced by her shadow on the wall behind her. It's like having two people in the shot!
Once the sun set, we weren't quite done yet. We used up all of the available light in the sky and I filled in where needed with flash. This gave the photos a more harsh look, which was quite fitting for our last location. We found a corrugated metal wall with a fan that was blowing warm air straight down. The fan was great to get Victoria's hair blowing around and she appreciated the warm air on a chilly evening. It wasn't long before the fan turned off and the cold started to win, so we had to call it a night shortly after dark.
First impressions are tricky things. Sometimes they can make you or break you. Other times they're completely forgettable. In my opinion, what really counts is the lasting impression, what you and the other person remember after you part company. For Victoria, I have a great impression after working with her and look forward to our next meeting. Hopefully I recognize her...
You can see more photos here.
Tuesday, November 17, 2009
Tech Tuesdays - Lastolite Tri-Grip Diffuser
There are some pieces of equipment that aren't always needed, but once you use them in a particular situation and see the results, you're never caught without them. For me, a diffuser is one of those pieces of equipment.
I use a Lastolite Tri-Grip 1-Stop Diffuser. Why is it called a Tri-Grip? Most diffusers and reflectors are circular or rectangular. The Tri-Grip is triangular, like fan. That's the "Tri". The "Grip" comes from a sturdy rubber and plastic piece that allows you to hold and position the diffuser without it losing it's shape. Most diffusers and reflectors are simply fabric stretched across a flexible fame. When you hold the side, you're actually holding onto a small piece of metal and fabric. The Tri-Grip's sturdy handle gives much greater control over the positioning of the diffuser.
The Tri-Grip is collapsible. With a simple twist, it folds up and fits into a small, flat bag (imagine a sun-shade for your car window... that's how it works). It's also very lightweight. Taking it to a shoot doesn't add much weight or bulk to what I'm already bringing along. It's also easy to hold or to strap onto a light stand. The handle has a large velcro strap on each side which can be used to secure the diffuser to various objects so that you don't have to hold onto it while shooting. Another great hand-free option is made possible by it's shape. Because it has flat sides, just set it on the ground, lean it so that it's reflecting a bit of light onto your subject and you don't have to worry about it rolling away like a round reflector or diffuser.
So now that you know what it is, how does the TriGrip work? I've just got one word to describe it: Awesome! Like I said at the beginning, you might not always need a diffuser, but once you know when and how to use it, you can get amazing results. I've used it in direct sunlight to decrease harsh shadows and give an amazing, warm glow to skin. I've put it in front of my flash units to diffuse the flash and give a more even look to my lighting. I've used it to reflect just a bit of light into some shadows. I've even used the case as a seat for a client when she was sitting on the ground so that she wouldn't get dirty!
In my opinion, photos speak louder than words, so take a look at some photos I've taken with my Tri-Grip Diffuser and you'll see that it does it's job and does it well. Now that I know how useful the Tri-Grip Diffuser is, I'm planning on getting a Tri-Grip reflector. If you do a lot of shooting in harsh light, I'd suggest you put a few of these on your wish-list also.
Labels:
Denver,
gear,
review,
Tech Tuesday
Friday, November 13, 2009
Sherri and Justin
Sherri and Justin are a super-cute couple who have moved to Colorado from out East. We spent the day together in Fort Collins sampling beer, shopping and taking photos. We shot at two different locations that both represent Fort Collins: the Poudre River and CSU.
One thing I noticed that they loved was just saying "Poudre". It inspired a giggle every time. That seemed to carry throughout the photo shoot. They both love to be goofy and have a good laugh. Sometimes during a shoot I'll tell a couple to get a little silly so we don't have as many "serious" photos. With Sherri and Justin I had to tell them to get a little more serious once in a while.
After spending a good amount of time on the river, we headed to CSU's campus to get in some photos before the sun went away for the day. Since it was a Saturday, there weren't many students around and it felt like we had the entire campus to ourselves. We started on the steps of the Administration Building and worked our way over to the library. On my last trip I noticed a tiled wall that I knew I'd have to use for a shoot someday. Today was the day and the photos in front of that wall are some of my favorite of the day.
I knew that a shoot with Sherri and Justin wouldn't be a "normal" shoot, so of course, it got a little strange at the end. Police cars and fire trucks came rushing towards the library. I would assume that someone was hurt inside, but hopefully everything was OK. Then there was this squirrel. It was having a staring contest with Sherri and wouldn't leave. Justin decided to start talking to it and it decided to take a flying leap from the sidewalk to a tree. It was the strangest thing we've seen in a while. Once we saw that this squirrel could jump pretty well, we decided to leave it alone and call it a day.
Once I got home and reflected on their personalities and interaction with each other, it inspired me to get a little funky when processing these photos. Thankfully, they are just as happy with the photos as I am.
You can see more photos here.
Labels:
couple,
Denver,
Fort Collins,
shoot
Tuesday, November 10, 2009
Tech Tuesdays - Tripods
Last week I was painfully reminded of how much I need my tripod. No, I wasn't in a low-light situation and came away with blurry photos. I was too lazy to go get my tripod out of my car and had to use... my old tripod!
To be fair, my old tripod was never really intended for serious photography. It's one of the $20 models that you can buy just about anywhere. While it's better than nothing, it leaves a lot to be desired. One of the first things I noticed after not using it for quite a while was how flimsy and wobbly it actually is. When I had never used anything else it felt just fine, but I now realize that it moves way too easily. When I extended the center column, I actually had to wait for the camera to stop swaying before I took the photo!
So now that you know what I'm comparing my current tripod to, you'll probably think that just about anything would be better. You might be right, but there are a few lessons to be learned from this experience. Read on to lean what they are...
My current tripod is a Velbon El Carmagne 530. It's legs are carbon fiber, which helps to keep the weight down, and the center column is aluminum. The head is a Velbon PH-250B. So what are the glaring differences between this tripod and my old one?
- Height: The Velbon gives me much more height to work with, and it's sturdy through the entire height range. I don't have to worry about a wobbly camera when the center column is extended. The legs also extend out, away from the camera which allows the camera to get to almost ground-level.
- Weight: The Velbon is much sturdier and as a much better head on it, but it weighs almost the same as my old tripod.
- Adjustability: All of the legs can be independently adjusted, giving a stable footing on almost any incline or terrain.
- Head: The head on this tripod is great. Not everyone is a fan of a pan-tilt head (many prefer ball-heads), but I love the fact that I can adjust one axis of movement without affecting the others. It's sturdy and locks tightly. I've never missed a shot because the head has allowed the camera to move.
- The Look: Although it doesn't make the tripod perform any differently, the Velbon definitely looks much more "professional". It also just looks cooler.
Although a tripod is not usually the most lusted-after piece of equipment for most photographers, a good, high-quality tripod should be considered an essential piece of gear. From landscape to fashion photographers, everyone will need a tripod at some point. When that time comes, make sure you've got one that you can rely on. I'm pretty sure if you throw that D3x with your 70-200mm f/2.8 on a cheap tripod and someone bumps it, it's going down and you're not going to have a good day.
Labels:
Denver,
gear,
review,
Tech Tuesday
Friday, November 6, 2009
Saraya
This weather we're having is just unbelievable! Last week we get almost 2 feet of snow and this week I'm in Fort Collins taking pictures of someone in shorts and sandals! You've just got to love Colorado weather. By the way, that someone was Saraya, a young lady from Cheyenne, WY who made the trip down to Fort Collins for a photo shoot.
We met in Fort Collins but headed up north of town to get a little closer to nature. The Poudre River flows north of town and we found a nice spot that had a trail, big trees and even a wooden bridge. We shot at the bridge for a while and then headed over next to the river with some huge trees as props.
As with all shoots, it takes a little while to warm up and start taking really good, relaxed photos. With Saraya, he initial photos were good but we really started clicking once we got next to the river. Some of her poses even remind me of something you'd see on America's Next Top Model! She was very dynamic and didn't just give me the same pose for 2 hours straight. Because of this, we got a big variety of really good photos.
The day ended with Saraya and her boyfriend (he came along for the ride) having a "swordfight" with sticks. After reviewing the photos we took, I can see that playful nature coming through in her expression in many photos. You can't ask for much more than a beautiful day, a fun-loving companion for a photo shoot and great images when you're done. Thanks, Saraya!
You can see more photos from the shoot here.
Labels:
Denver,
Fort Collins,
shoot
Tuesday, November 3, 2009
Tech Tuesdays - Adobe Photoshop Lightroom 3 Beta
I've been a user of Adobe Photoshop Lightroom 2 for the past year. It's an amazing piece of software that not only acts as a database and catalog for all of my photos, but also gives me much of the editing power of Photoshop within the same program. I'm not going to go into a big explanation here about what it does, but I will say that, other than my camera and lenses, this is the most-used "cog" in my photographic process.
When I read on Scott Kelby's blog that Adobe was releasing a beta version of Lightroom 3, I couldn't download it fast enough! He writes some of the most useful and entertaining books about Adobe products and he's a pretty good photographer also, so when he gets excited about the new features in Lightroom 3, I get excited.
I downloaded (get it here) and installed Lightroom 3 Beta (I'll just refer to it as LR3) and have been using it for the past week, alongside Lightroom 2 (LR2), for my daily photo organizing and processing needs. Here are a few of my thoughts:
One of the biggest changes that will make things so much easier is the catalog backup runs on the program close instead of on the program open. In LR2, you sit down, open LR2, you're ready to do some serious photo stuff and LR2 decides it's time to backup your catalog, which takes a few minutes. Now, in LR3, it doesn't do a backup until you close the program. It's so nice to just close it and walk away while it performs it's backup.
Import: In LR2, when you attach a camera or want to import photos, a separate dialogue box pops up and guides you through the import process. In LR3, there is a nice new "From/To" feature that opens in the Lightroom desktop instead of a pop up window. It shows the disks you're importing from on the left side of the screen and it shows your system disks and free space on the right. Some options have been added to the top of the screen for "Copy, Move, Add, Copy as DNG". All of the previous options still remain, such as automatic backup location, develop options and file naming.
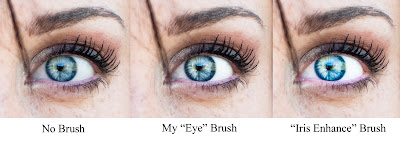
Develop: There are a few new brush presets named Teeth Whitening (it works good, but watch out for people's gums... you'll turn them gray) and Iris Enhance (I don't care for it... it does too much and looks unnatural).
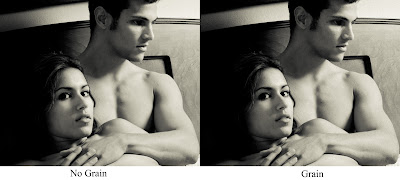
One big change from LR2 to LR3 is that sharpening is applied in real time to the image instead of just on export. Now you can see what your final image will look like before you export it! The spot heal seems to work much faster, but I didn't notice any difference in the results. Another new feature is film grain, which adds a more "filmy" look to photos, especially black and white photos. There's a decent amount of control available, so you can get just the look you want.
Scott Kelby mentioned "drag and drop" publishing to the web, but I couldn't figure it out. I'll keep trying.
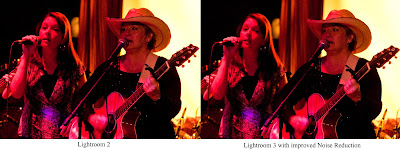
Another big improvement is in the noise reduction. It produces a much more pleasing image from my D90 with an ISO of 3200, with just a little softer details, much better blacks and solid colors. It also makes the noise look more like grain than colored noise. Skin ends up looking better and I found I was able to go higher with the exposure and fill light levels without encountering noise issues.
Export: In the export options, Export to Flickr is now included as a default. It's nice, but not as robust as "Jeffrey Friedl's Flickr Export Plugin". You are only able to export to your Flickr photostream, but not able to add photos to groups or sets like the Export Plugin. On a quick side note, I found that JPG file sizes are larger for LR3 than JPGs exported from LR2 with identical settings.
Another huge improvement to the export option is the ability to export photos with a custom graphical watermark, not just text. In my short time using this feature, it's very useful, giving me the ability to choose the watermark's location on the photo and saving me from having to open every image in Photoshop just to add a watermark. Thank you Adobe!
Web Gallery: There were no new gallery options that I saw, but once again the ability to export with a watermark is available. In the gallery preview, the watermark location appears to be incorrect and move from photo to photo, but the exported version was always correct. One change for the worse is that LR3 seems to be slow to show it's status when exporting. When I clicked Export and didn't see the status bar in the upper-left corner after a few seconds, I thought that maybe I didn't actually click Export. It turns out that it just takes longer to appear than in LR2.
I'm happy to say that after one week of using Lightroom 3, I only experienced one error. A brush got stuck so that anytime I moved the mouse it acted like I was clicking a button. I ended up with about 50 brush clicks, but those were easily undone in the history panel. I switched back to the grid view, selected the photo again, started editing and didn't experience any more problems.
So far, I've been having a great time using Adobe Photoshop Lightroom 3's Beta version. I can't wait to see what improvements the final version has for us. It seems like Adobe's programmers listened to the users of LR2 and came up with some really useful improvements for LR3 without sacrificing the feel or functionality of LR2. If you're an LR2 user, you'll immediately feel right at home with LR3. If you're new to Lightroom, the LR3 Beta version is a fully-functional version that would be great to learn on if you're not sure you want to spend the money yet. I will warn you, though. Once you seriously use Lightroom and make it a part of your workflow, you'll probably find that you can't get along without it and buy the full version. Consider yourself warned.
You can download Adobe Photoshop Lightroom 3 Beta here.
Labels:
Denver,
gear,
review,
Tech Tuesday
Monday, November 2, 2009
Bouba
My photo shoot with Bouba almost didn't happen. I had a last-minute cancellation and really wanted to fill my schedule, so I posted a Hail Mary listing on a modeling web site looking for anyone willing to shoot last-minute. Bouba responded within about 5 minutes saying that he was willing to shoot on short notice. Thankfully, he turned out to be a great guy to work with!
We met downtown for some business-like shots. Bouba pulled up in his shiny black car and stepped out in his suit. He gave the impression of someone of great importance, but he was as nice as anyone I've worked with. We walked around LoDo, taking photos and trying to find the perfect location to shoot. For not having any time to plan, I think we found some great locations.
Bouba was even willing to do a complete change of clothes to get an athletic shoot in as well! After changing in his car (I think all models are very good at this), he was no longer a businessman... he was an athlete! We headed to a park, got some quick photos and then had to run from the rain. Hopefully, our next shoot will have more notice and better weather. As long as it's anywhere as good as this one was, I'll be happy!
Note: this shoot is from my "archives". I'll have current shoots up later this week.
You can find more photos here.
Subscribe to:
Posts (Atom)