Showing posts with label Better Photos. Show all posts

Friday, August 19, 2011

Utilize Backlight - Better Photos... Now!

We've all seen a photo where there's a  group of people looking at the camera, but they're squinting because they're looking directly into the sun.  It's an easy mistake to make.  You want your subject to be well lit and there's not a better light source than the sun, right?  The only problem is that the resulting photo isn't that great, it's got deep black shadows and your subject is now temporarily blind.  What other options do you have?  Backlight!

By placing the sun behind your subjects, you've completely changed the look of your photo.  Your subjects are no longer squinting, so that's good.  If you've exposed for the shadows on their faces, all of their features will be visible.  Unfortunately, your background is a lot brighter than your subject, so now it's probably pure white.

By getting a little creative with your subject placement, you can create a more interesting background than just pure white.  Find a tree that you can place between your subject and the sun and you'll get a colorful and interesting background for your subject.  You can also use your flash or reflect some light back into their faces to decrease the contrast between your subject and the background (for a reflector, I use a Tri-Grip).  Just be careful you don't reflect too much light or they're going to start squinting again!

Backlighting is a technique that changes for every situation and takes practice to master.  Be patient and keep practicing and eventually you'll start to get results that you're very happy with.  Your subjects will thank you.

NOTE: The entire time your subjects have the sun to their backs, you are facing the sun.  Never look at the sun through your camera!  Also, don't forget to turn around once in a while and see how the light actually looks when it falls directly on something.  Sometimes the intensity of the sun decreases while you're taking photos and you can use it to directly light your subject with beautiful sunlight!

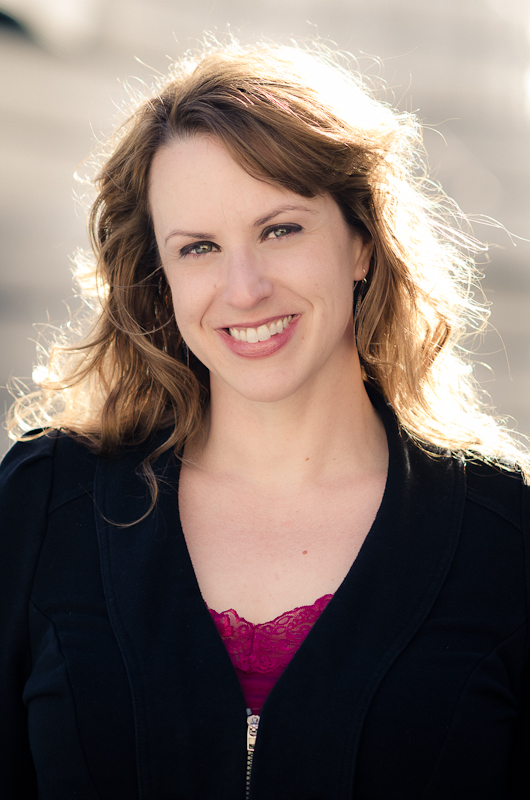
Here's an example of a photo with strong backlight and reflected light
to fill her face.

Here's another example with strong backlight and reflected fill light.

Here's a more subtle example of backlighting, but this time there is
no reflected light.
Read all of my DSLR tips here.

Friday, July 29, 2011

Don't Rely On Photoshop - Better Photos... Now!

When it comes to photography, it seems that there are two different schools of thought about getting your photos right in-camera.  This couldn't have been more apparent after hearing a few different photographers speak at different events a few months ago.  One photographer believes it's all about the moment and missing a moment while you try to get a perfect exposure just isn't worth it.  Another photographer believes that getting the exposure perfect in-camera is the only way to shoot.  Regardless of where you fall on this topic, you should probably try to get your photos as close to perfect in-camera as possible (by anticipating the moment if necessary).  Although photo editing programs can work wonders with RAW files, you'll save yourself lots of time and probably get better results if you just get a proper exposure the first time.

When you properly expose an image, everything is balanced.  Shadows are dark but still retain detail.  Highlights are bright but not blown out.  Skin looks normal, colors are saturated and contrast isn't too strong.

When you over or underexpose an image and try to fix it after the fact, shadows can start to show noise and run to deep black with no detail.  Highlights can be completely blown out with no recoverable detail.  Contrast gets much stronger than normal.

Of course, there's always a little wiggle room.  You can be off by 1/2-stop without any real issues.  In a scene without a huge dynamic range you can probably even be off by around 1-stop and get a great looking image.  Any more than 1-stop and your results may or may not be acceptable.

There are always going to be photos that are under or overexposed.  Maybe a moment caught you off guard and your settings weren't perfect.  Maybe you just metered incorrectly and didn't nail the exposure.  It happens.  The less often it happens, though, the better your overall images will be.

Here are a few quick examples from a recent wedding that illustrate the importance of getting the exposure correct in-camera.

Here's a photo that was incorrectly exposed.

While it's possible to recover lots of the information, the highlights
are blown out beyond recovery and the image
doesn't look very good.

Here's an image captured under the same conditions that was properly exposed in-camera.  Much better...
Read all of my DSLR tips here.

Friday, June 3, 2011

Don't Delete Photos - Better Photos... Now!


If you ever photograph in natural light or changing lighting conditions (think of a wedding where you can quickly move from shooting inside of a church to outside in the sun), you'll eventually get a good photo that is severely under or overexposed because you didn't change your camera settings quickly enough (you are shooting on manual, right?).  Don't delete that photo!  If you're shooting RAW, you'd be surprised at what you can do with a little post processing.

Of course, shooting a poorly exposed photo isn't the only issue you might have.  Maybe your subject moved and you got some motion blur.  Maybe your focus didn't lock where you expected and you got an out of focus photo.  Maybe a dog ran in front of the camera.  Maybe it was just a test photo.  All of these are very real possibilities and, although they might not have given you the image you were expecting, you might just be happy with the results anyway.

I've also heard stories that deleting photos in-camera can mess up the formatting on the card and, on rare occasions, corrupt other photos.  While the odds of this happening are pretty small (I don't personally know anyone this has ever happened to), if there's a chance it might happen at an important event like a wedding, it's probably not worth deleting a few photos just to free up a bit of extra space.

Here's an example of an overexposed photo before and after processing.


And a few more recent wedding photos that illustrate my point:

This was just a test photo before Payal's portrait.  She was talking to her brother when I took this.

Again, this was a test photo while the group was messing around.

Someone else's flash fired at the same time I took this photo.  For some this is a ruined photo, for others it's beautiful.
Read all of my DSLR tips here.

Friday, May 27, 2011

Don't Use Live View - Better Photos.. Now!


If you're fairly new to using a DSLR, you're probably more comfortable using the live view option than you are putting your eye up to the viewfinder.  If I can make a small suggestion... don't use live view!  Use the viewfinder.  Why?  Read on to find out.

A DSLR is heavier than a point and shoot.  A lot heavier.  When you look through the viewfinder, you're actually using your face to steady the camera.  A steady camera gives sharper photos.  If you're using live view, you have to hold the camera out away from your body.  With a heavy camera like a DSLR, it can be very hard to hold it steady when it's not right next to your body (or pressed up against your face), which can result in soft photos.

Another reason to not use live view is that there's generally a lag between when you press the shutter button and when the camera takes a photo.  Because of the way DSLRs operate, there is no way to get rid of this lag.  Shutter lag is bad.  Even though it may only be a split-second, it's still enough to miss the perfect expression, the best focus or that butterfly that just flew away.  By looking through the viewfinder, your camera is always ready to shoot and capture the exact moment you want to capture.

Of course, there's always going to be circumstances where live view is a great option to have.  If you're holding your camera up above your head to get a shot, it's usually better to use live view so that you can see what you're shooting rather than shooting blind.  It's also a great option to have when shooting group photos so that your head isn't behind a camera while you're trying to direct a bunch of people.

As with everything, live view is fine when used in moderation and under the right circumstances.  The sooner you get comfortable with putting your eye up to the viewfinder, the sooner you'll start getting better photos!

Read all of my DSLR tips here.

Friday, May 20, 2011

Start A Project – Better Photos… Now!


Have you ever wanted to push yourself outside of your photography comfort zone but weren’t sure where to start?  One of the best places is to start a photography project where you take a photo every single day.  The most popular type of this project is usually called a 365, meaning you take a photo every day for a year.  Think a year sounds a little too intimidating?  Try taking a photo every day for a month or even just a week.  You’ll quickly find that taking a photo for 7 days straight is harder than you’d think.

If the point of taking on a project like this is to push yourself and your creativity, you need to do just that.  You can’t just take a photo of your cat or a houseplant every day and call it good.  You’ll need to constantly find new subjects and locations to keep things fresh. 

Some people choose to do a self-portrait every day.  Some people try to create a theme to shoot around.  I’m sure different things work for different people, so don’t get hung up on a theme.  If something isn’t working for you, change it up.  Just keep taking photos! 

If you followed my previous advice and took a peek around Flickr, you’ve probably seen people discussing their 365s.  Flickr is a great resource for ideas and support when you’re trying a 365 of your own.  Somehow, the knowledge that other people are going through the same thing as you (not enough time, lack of ideas or inspiration, missing a day or two) can be a great relief!  Read through other people’s posts and find a group that you feel at home in and will want to visit once in a while. 

At the end of a year, you’ll be amazed at what you’ve photographed and how much you’ve grown as a photographer.  My own 365 documented my growth as a photographer and, looking back, I am so glad that I did it.  From my first studio session to my first wedding, family trips and fun vacations, successful experiments and dismal failures it’s all documented with a photo from every day.  If you’d like, you can view all of my photos here (or you can just go straight to the good stuff and view my favorites).

Here are a few photos that I never would have taken if it weren't for my 365:


Read all of my DSLR tips here.

Friday, April 29, 2011

Frequent Photography Forums - Better Photos... Now!


Regardless of whether you've been a photographer for 10 days or 10 years, you probably have a question about something from time to time.  These days there are more photographers than ever before.  There is also more accessible knowledge than ever before.  Just go online, type your question into a search engine and you'll probably find that the majority of your results come from photography forums.

Photography forums are just like any other online forum.  Some are very helpful, some have a more active community than others and all are going to have a few people who just like to cause trouble.  If you have questions that need answered, it's probably in your best interest to find a forum (or forums) that are welcoming of questions from any level of expertise.  These are usually the most welcoming and helpful communities.

Two forums that I've found to be particularly helpful are Open Source Photo (OSP) and Flickr Groups.  OSP is made up of mostly professional photographers, which means that there are quite a few posts about business and marketing in addition to the expected portrait and wedding photography posts.  Flickr Groups are much more suited to any skill level and photography preference.  You can just as easily find answers to a question about fashion photography or landscape photography.  I've found answers to questions that I've had about Polaroid and Holga cameras, as well as more obscure photographic techniques.

In short, if you're not utilizing photography forums, you're missing out on a vibrant community of photographers around the world.  Together, the collective knowledge available to you through forums would take many lifetimes to learn on your own.  The next time you have a question about something, why not ask it in a forum?  You'll probably be surprised by the responses you get.

Friday, April 22, 2011

Focus and Recompose - Better Photos... Now!

In photography, focus is everything.  If your exposure isn't perfect you can usually still get a good image with a little work in post processing.  If your composition isn't perfect you can usually crop to get a better composition.  Unfortunately, if your focus is off there is no way to fix it after an image is taken.  While there is always a time and place for out of focus images, it's something that you want to have total control over.

When using apertures that give you a very shallow depth of field, your focus is even more important.  If you're photographing a person's face, having an out of focus eye but an in focus nose can be enough to ruin an image.  So, how do you get the composition how you want it with the focus where you want it?  Focus and recompose!

If you've been following my recommendations so far, you're probably using spot focusing.  If you're not using spot focusing, you can safely ignore this blog post since you don't have complete control over what your camera chooses to focus on.  If you're using spot focusing, here's how to take your focusing to the next level.

Regardless of which focus point you choose to use, you'll occasionally come across a situation where your composition doesn't quite match your focus point and your camera has trouble focusing.  When this happens, the solution is simple.  Compose your image so that your camera focus on the proper part of the scene and then recompose your image.  As long as you're not really close to your subject and are not shooting with a super-shallow depth of field, the part of your image you originally focused on should still be in focus in your new composition.

This is also a trick that you can use if your camera isn't locking focus on an object that is a solid color.  Because auto focus systems rely on contrast to focus, a solid color can make focusing impossible for your camera.  If this is the case, focus on the edge of the object, recompose and take your photo!

You might notice here that the bottom image is a little sharper than the top image.  Not a huge difference, right?

In these tight crops of the same photos you can really see a difference.  Notice in the top photo that the point of
focus is on her earrings, not her eyes.  At these distances you need precise control over your focus.
The above two photos were literally taken 3 seconds apart.  Shooting at this distance at f/2.8 I lock my focus and recompose after every shot.  It can make the difference between a keeper and a reject.

Read all of my DSLR tips here.

Friday, April 15, 2011

The Rule Of Thirds - Better Photos... Now!


You've probably heard people talk about the "rule of thirds".  This basic idea of composition doesn't just apply to photography, but to all forms of visual art including cinema, drawing, painting and graphic design.  By understanding and applying this concept your images will become more powerful, engaging and interesting.

To quickly and easily see the idea behind the rule of thirds, take a look at this:


You'll notice that this rectangle is divided into three equal sections, both horizontally and vertically.  By placing your subject closer to the outer sections instead of in the center section, you create a more dynamic image that most people find more visually appealing.  If you put your subject on one of the points where the horizontal and vertical lines intersect, your image just becomes that much more powerful.

Don't believe me?  Take a look at some images, either online or in your immediate environment, and you'll notice that most of them follow the rule of thirds.  I'm sitting in a hotel room right now and every painting and photograph on the walls is composed with the rule of thirds.  Turn on your TV and you'll rarely see a person in the center of the screen.  Even local news broadcasts are composed according to the rule of thirds!

Of course, rules are meant to be broken and the rule of thirds is no different.  If you really want to call attention to your subject, placing it in the center of a photo can do the trick.  This typically works best when the background is clean and uncluttered so that all of the viewer's attention is drawn to your subject.

Many DSLRs have the option to turn on a "grid" in the viewfinder and a rule of thirds overlay is usually one of the options.  If you're just getting started using the rule of thirds, this is a great guide.  It's free and easy, so why not?  Plus, if there are any straight lines in your image, the guide can help you to keep them straight in your composition.

That's about all there is to the rule of thirds.  It's a very simple but very powerful tool that you can use anytime you take a photograph.  It doesn't matter what your subject is, what the lighting conditions are, what lens you're using or what camera you have.  You can always use the rule of thirds.  Enjoy!

You can see here my head is pretty much in the center of the frame.
This isn't the best composition for this photo.  I think I need
to work with Belinda on composition.  ;)
You can see here that Kevin's head is in the upper-third of the image.
This makes for a much more pleasing composition.
Again, Belinda's head is in the center of the frame but her eyes are in the upper-third of the image.
Here's a wedding photo with lots of negative space on the right side of the frame.  Notice that the upper-third contains
their heads and the left-third contains their bodies, taking advantage of the intersection of lines.

Read all of my DSLR tips here.

Friday, March 18, 2011

Use Spot Metering - Better Photos... Now!


Pop quiz!  You're at a wedding.  You're getting ready to take a quick photo of the groom.  He's fair-skinned, wearing a black tuxedo, standing in front of an amazing sunset.  Which part of this scene will your camera use to meter the exposure for this shot?  Which part of this scene do you want to be properly exposed?

Chances are you want his skin to be properly exposed.  If your camera exposes for the sunset, everything else will be underexposed because of how bright the sky is compared to everything else.  If your camera exposes for the tuxedo, everything else will be overexposed because of how dark it is.  If your camera happens to find the grooms's head and expose for it, you'll probably have a slightly blown out sky and slightly underexposed tux, but at least you'll know who it's a photo of.

Most situations you encounter aren't going to be this extreme, but what happens when you've got to get the shot and don't have all day to figure out the exposure?  Better yet, what happens when your camera isn't giving you the results you want and you need to take control?  Time to learn how to use spot metering!

Spot metering is very similar to spot focusing.  Your camera has lots of metering modes that it can use to determine exposure.  Spot metering just uses one small part of your composition (usually the point of focus) to determine exposure.  That means that if you're focusing on a person's face, you'll also get an exposure reading for that person's face, not her clothing or the sky behind her.

Using spot metering has allowed me to get some shots that I might have otherwise missed.  For example, at a recent engagement session in Golden, the sun was setting behind the mountains faster than we thought it would.  I literally had seconds to get a few shots with the last golden rays of sunlight backlighting Veronica and Luke.  Because I was able to meter off of their faces (and not the bright sunlight behind them), I got the correct exposure and some great shots that look different than anything else we got that day.

While there might be a time and a place for different focusing modes, I don't think I'll ever have a reason to take my exposure metering off of spot metering (at least not for portraiture).  Here are a few more examples of shots that would have been very tough to get with any other type of metering than spot metering...

In this photo of Mia, I'm basically shooting into the sun,
which is not an easy situation for a camera to meter.

For an image like this, the camera would have likely tried to set a long exposure.  I wanted a very short exposure
to capture the shape of the flames, so I metered off of the flames, not the logs.

Here's another photo shooting into a light source.  The difference
here is that the rest of the room was fairly dark, so I had no
idea if it would try to expose for the light or the darkness.
I hope you see how useful spot metering can be.  Whether you're looking for creative control or just confidence in your exposure, spot metering is very useful to master.

Read all of my DSLR tips here.

Friday, February 18, 2011

Use Spot Focusing - Better Photos... Now!

Having all of the technical knowledge and technique in the world doesn't mean a thing if your photo isn't properly focused. With today's autofocus systems, focusing is probably the least of your worries. There are certain situations where it's good to have a few tricks up your sleeve and know when to take control of focusing.

There are a few different types of autofocus (AF) modes in today's DSLRs. I'm not going to give a big rundown of all of the different names and types, but if you're interested, you can read this excellent blog post. For the purposes of this post, I'll be focusing on single point focusing.

For portraits, it's widely believed that a subject's eyes must be in focus. If you are shooting with a decent sized aperture, say f/5.6 and above, as long as your subject is in focus you'll probably get your subject's eyes in focus with any AF mode. When you start shooting at larger apertures, though, you'll need to be a bit more selective about where your camera focuses.

I shoot most of my natural light portraits at f/2.8. When you're close enough to shoot a head-and-shoulders portrait, the shallow depth of field you get is enough to easily lose focus on the eyes. That's why I always shoot in single point AF mode. Instead of letting my camera decide where to focus (which usually ends up being the tip of the subject's nose), I use one AF point (usually the center) and focus on my subject's eye that is closest to the camera, then recompose and take the photo. At extremely large apertures such as f/1.8 or f/1.4, I'll even move the focus point to the eye instead of focusing and recomposing, because at such large apertures recomposing can still cause the original focus point to be out of focus.

Another situation where it's great to take control of your focus points is any photo with strong backlight. Most AF systems work by detecting contrast and strong backlight can fool even the most advanced AF systems. By switching to single point AF, you tell the camera where to look and focus, effectively telling it to ignore the backlight and just focus on your subject.

Low light situations are similar to strong backlight. Because AF systems work with contrast, there is almost no contrast in a low light situation. Any little light in the background (maybe a candle at a wedding reception) can trick the AF sensors and throw your subject out of focus. Fortunately, by switching to manual mode you again tell your camera to ignore these little areas of contrast in the background and focus on your subject. In extremely dark situations you might even have to switch to manual focus mode, but that's an entirely different blog post.

Finally, don't just check the screen on the back of your camera and assume your photos are properly focused. Unless you're looking at images on a large screen at 100% size, it's almost impossible to tell if your camera is focusing on a subject's eyes or nose. Learn how your camera works and use that knowledge to get the sharpest photos possible.

Practice using single point AF. Practice moving your AF point around while you're shooting so that you don't always have to focus and recompose. Recognize which situations cause your camera's AF system to hunt for focus and learn to switch AF modes. Scrutinize your images at full size when you get home and see how they really look. With a little practice, you'll get sharper photos more often. You'll also be able to overcome challenges as they happen and get the shot that you want.

Here are a few examples of shots that I've been able to get with spot AF:

These two photos were completely backlit, which means I was focusing on their outline.  The fill-light on Jill and Mike came from my flash.
In this photo, even in spot AF mode, the camera still focused on the lights in the background.

Just a second later after recomposing and refocusing, I was able to get this shot.
Here's a strongly backlit portrait shot at a wide aperture.  By using spot AF, I was able to get her eyes nice and sharp.

Here's the original image...
... and here's a tight crop of her eyes.

Read all of my DSLR tips here.

Friday, February 11, 2011

Use The Info In Your Viewfinder - Better Photos... Now!

Here's an easy tip for you. To take a picture, you have to look through your viewfinder, right? How often do you look at the information along the bottom of your viewfinder? If you're ignoring that info, you're missing out!

Most DSLR viewfinders show a variety of information, but usually they'll at least tell you if you are focused on your subject, shutter speed, aperture, exposure, ISO and number of shots remaining on your memory card. This is important information and it's all available without ever having to take your eye away from the camera.

When I first started using my DSLR, I ignored this information. I was so focused on composition and making sure I was doing things correctly, it was easier to ignore this part of my viewfinder than to try to process the extra information. Once I started using this information, though, it actually made it easier to get the photos I wanted. Why? Because if something was wrong, I could quickly check my camera setting in my viewfinder and see what needed changed. If my exposure meter is telling me the photos is going to be underexposed but I'm already at a pretty low shutter speed, I just check the ISO and see if I can raise it. Maybe I see I've only got 10 images left on my memory card. I'd much rather know ahead of time than fill up my card right when I least expect it.

Ultimately, the information in your viewfinder is just another tool that you can use as you see fit. Use it in a way that benefits you and it can only help. So, the next time you look through your viewfinder, pay attention to all of that other information that's in there. Someday you'll thank me!

Thanks to Rob Galbraith for the image.

Read all of my DSLR tips here.

Friday, January 28, 2011

Turn Off Your LCD - Better Photos... Now!


One of the main reasons for shooting digital instead of film is the ability to instantly review the photos you just took. With film, you don't really know if you got the shot until you get the film and prints back from the lab. With digital, you just look at the back of the camera the instant you take the photo and you're able to see your composition, histogram and highlights/shadows. Once in a while it's a good idea to just turn your LCD off.

Why would you turn your LCD screen off? What benefit could possibly be realized by losing the ability to review your photos? Let me throw a few out there and see what you think.

When you can't instantly review your photos, you're going to be forced to think about things like composition and exposure a little more carefully. Without an instant review of your photos, you'll probably take a bit more time while composing your photos. When you take more time, you start to notice little things that you might have initially missed when composing your photo.

When you slow down, you'll probably also start to pay attention to other parts of your camera that you might not have looked at before. How's your exposure? How about your focus? Is your shutter speed suitable for your shooting conditions? All of these things are very easy to quickly check without ever taking your eye from the viewfinder, but how often do you actually check them? When you can just look at the back of your camera to see how the photo looks, I'd bet the answer is "not very often".

When you slow down and aren't looking at your viewfinder after every shot, you're more likely to be more engaged with your subject as well. If you're a landscape photographer, the trees and mountains probably don't really mind if you ignore them, but if you're a portrait photographer, your subjects might like some attention. I'm not suggesting you shoot an entire portrait session without reviewing your photos, but it might be nice to spend 5 or 10 minutes just shooting and not worrying what the photos look like. Chances are, if you can get your exposure set, you'll get some great expressions while you're interacting with your subject instead of checking the back of your camera every few shots.

Read all of my DSLR tips here.

Friday, January 21, 2011

F-Stops - Better Photos... Now!


If you're new to DSLR photography, you're probably familiar with shutter speeds. The shutter stays open for a certain amount of time, which allows a certain amount of light to enter the camera. You might not be quite as familiar with the concept of apertures and f-stops.

A lens aperture is the opening in your lens that the light passes through. An f-stop is a way of measuring the size of that opening. The bigger the opening, the more light that enters the camera. This part makes sense, right? Here's where things get a little confusing with the terminology. The larger the aperture (bigger hole), the smaller the f-stop number. The smaller the aperture (smaller hole), the larger the f-stop number. For example, f/1.4 is a very big aperture (big hole), while f/32 is a very small aperture (small hole). Although it might be a little counter-intuitive, it's just the way it is.

So why would you want to adjust the amount of light coming into your camera? Why not just change the shutter speed? Changing the f-stop can drastically change the look of your photos. Have you ever seen a photo where the subject is in focus but the background is blurry? That was probably taken with a lens with a large aperture. This kind of image is just not possible with a small aperture. At the opposite extreme, almost any landscape image you've seen where the flowers in the foreground are just as in focus as the mountains in the background was probably taken with a very small aperture. This is just one reason to use different apertures in different situations.

Another reason to use different apertures is to allow in more or less light. If you're shooting in low light conditions, the ability to open up your aperture and allow in a lot of light, while still using a reasonable shutter speed, might mean the difference between getting the shot and not getting the shot. At the other extreme, if you're shooting in full sunlight, you might want to use a very small aperture and allow a lot less light to enter your camera.

Aperture and shutter speed are directly related. An increase in shutter speed (faster shutter=less light) can be offset by an increase in aperture size (bigger opening=more light). A decrease in shutter speed (slower shutter=more light) can be offset by a smaller aperture (smaller opening=less light).

To wrap up this discussion, let me list a few situations where you might want to use different f-stops:

Large aperture (f/1.4, f/2.8, f/4) - Low light conditions, isolate subject from background, artistic blurring effect.
Small aperture (f/11, f/16, f/32) - Bright light conditions, keep everything in focus, landscapes.

Be aware that shooting at your lens' extreme apertures typically will somewhat degrade image quality. If you're shooting at f/1.4, all of your image will appear a little "soft", meaning that even the point of focus will not be as sharp as if you'd shot it at, say, f/5.6. Also, if you shoot at f/32, you'll encounter more diffraction, which will lead to a decrease in image quality. This doesn't mean you shouldn't use these extreme apertures, but only that you should be aware of these potential effects.

You should always experiment with your lenses to see what effect different f-stops have at different focal lengths. For example, f/4 will look a lot different on a 12mm lens than it will on a 200mm lens. Once you're familiar shooting with your different lenses at different f-stops, you can start to create the images you want to see.

Here are a few examples to illustrate this last point:


This image was shot at f/4 with a 12mm lens.  Notice how everything is pretty well focused.
I shot this at f/4 because that's as wide as this lens would open and it was getting dark.

This image was shot at f/4 with a 50mm lens.  Notice how the background retains some detail but isn't very focused.
I wanted to make sure all of the family members were in focus, but everything else was out of focus.

This image was shot at f/4 with a 135mm lens.  Notice how the background has gone completely out of focus.
Even the grooms glasses are starting to go out of focus.

Read all of my DSLR tips here.

Friday, January 14, 2011

Lens Filters - Better Photos... Now!

You've probably heard it from almost everyone you've talked to: You'd better put a filter on your lens to protect it. If you're going to spend hundreds, even thousands of dollars on a lens, doesn't it make sense to do everything you can to protect that precious piece of glass? It depends.

The most popular filters to use on a lens are skylight or UV filters. These are both essentially clear filters that, unlike a polarizing or colored filter, don't really affect the properties of the light that enters the lens. The appeal of these filters is that they provide an extra layer of protection between your lens and any dust, dirt or fingerprints that could damage your lens and affect your photos.

Unfortunately, most people (myself included) don't buy a high-quality filter for that expensive lens. Instead, we get decide to save some money and buy the cheap filter. Granted, the cheap filters might only cost $30-$50, while a high-quality filter might cost $200-$300. That's a lot of money to spend on a filter. Compared to a new lens, though, it might be a very good investment.

So why should you spend the money on a good filter? Maybe it's easier to let you know why you shouldn't buy a cheap filter. For the majority of situations you encounter, it won't really matter if you have a cheap filter on your lens. Sure, if you want to get really picky, it might degrade your image quality a bit. Lenses are, after all, built to very strict standards with very high-quality glass and sticking a cheap piece of clear glass in front of a lens isn't going to make your image any better. Ultimately, though, for the average photographer (or client) it's not going change the image quality enough to matter.

There are certain situations where it does matter. For example, when you're shooting a subject and there are defined light sources behind her, you might experience green "ghosts" in your image. When this happens, it's almost impossible to get rid of these after the fact. Making matters worse, it's very difficult to even notice them while you're shooting, so unless you're really scrutinizing your photos as you take them, you might not notice you've ruined your photos until it's too late. High-quality filters are designed so that they don't ghost and will not ruin your photos.

What can you do if you don't want to spend a few hundred dollars on a filter but don't want to risk damage to your lens? First, if you have a lens hood, it should always be on your lens. This will help protect your lens from the majority of bumps you might encounter that could damage your lens (or at least the front element). Second, if you must use a filter, be aware of the kind of situations that could cause problems and remove the filter if you encounter such a situation. It's better to have it on 95% of the time than not at all, right? Some people (myself included) have just decided to go filterless. If you always use a hood and regularly clean your lenses, you shouldn't encounter any issues. Of course, there's always a risk that your lens will be damaged, but that's a risk you have to be willing to take if you decide to not use a filter.

Ultimately, you need to do what makes the most sense to you. Do you regularly take photos of motocross or in the Sahara desert? You'll probably want a little extra protection for your lens. Do the most extreme situations you encounter involve a baby spitting up? You're probably pretty safe shooting without a filter. Of course, you need to decide what your comfort levels and needs are, but with a little thought and common sense, you should be able to reach a compromise between image quality and lens protection.

Here are a few of the images where I first realized how much a cheap filter could ruin a shot.  Keep in mind, I haven't used a filter on my lenses for quite a while, so I had to go pretty far back to find some images that worked as examples.  Also, these aren't necessarily the best shots from this event, just the best examples of ghosting.  :)

Notice the ghosts from the windows on the children.
Again, you can see the window's ghost on the guy's arm.

This is a very bad ghost.  It's coming from the door behind the crowd.
You can actually see the trees that were outside!
For more on this subject, hop on over to this excellent article by Thom Hogan.

Read all of my DSLR tips here.